If you want a proper guide on starting a blog, you are at the right place. This is a detail and an ultimate guide on how to start a blog.
But before we delve into the guide a question may arise:
Is blogging dead? or Is it worth blogging in 2022?
You will find it interesting to know that Google gets over 100 billion searches every month and 77% of them are still reading blogs daily.
Blogging isn’t dead but has changed just like every other thing changes with time. It has been prioritized by B2B channels shifting it from being just a pure blogging to becoming a content marketing.
If you know the right way to do blogging it will surely yield results.
Therefore, the best time to start blogging is today.
Here is a report by Orbit Media suggests that 1 in 5 bloggers report strong marketing results which indicates blogging works for most bloggers.
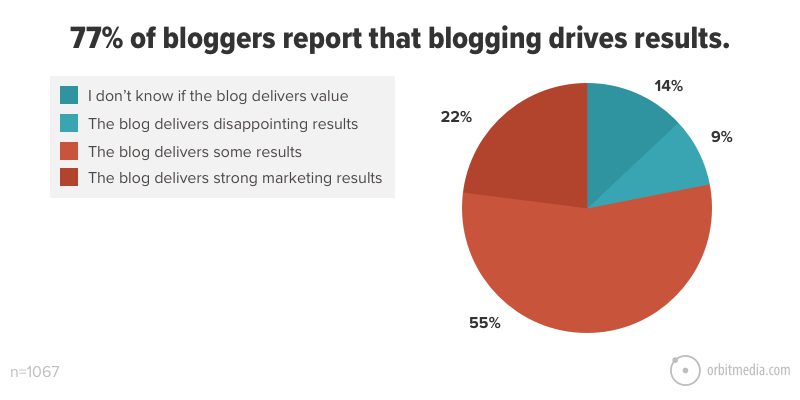
Source: Orbit Media
Even new bloggers are making a substantially huge amount of money by taking the right steps.
So, blogging works but you need to work properly with smart steps as explained in this illustrative guide.
Why this guide?
There are multiple guides over the internet which speaks about starting a blog but what I feel is that those are general and outdated steps which are not really working right now.
At present, for successful blogging you need smarter steps:
– to scale your blog within a short period of time
-to generate income from it fast
This is what you will learn in this ultimate guide.
The 13 step-by-step process to start a blog are:
- Choose a Niche for your Blog
- Pre-plan your Blog’s Launch In 6 Steps
- Decide a Domain Name for your Blog
- Get a Web Hosting and Domain for your Blog
- Install WordPress in Bluehost
- Design your blog with a WordPress Theme
- Install important WordPress Plugins for your blog
- Integrate Google Analytics and Google Search Console with your Blog
- Do Basic SEO Settings for your Blog
- Create pages and posts for your Blog
- Regularly Publish Content on your Blog
- Grow your Blog
- Monetize your Blog
Quick 3(three) motivating reasons why you should start blogging in 2022
Generate Income
You will hear bloggers tell you that it is passion that can enable you to blog but the major driving force is income from the blog.
Free yourself from a monotonous Job
Successful blogging can make a good amount each month which is more than a 9 to 5 monotonous job. Type blog income report in google and you can see bloggers are earning huge amounts through their blog.
Once you are able to drive some considerable traffic in your blog you can earn a significant amount every month which will eventually free you from your job.
I am not saying it will happen overnight but gradually things will start working if pursued in a proper way.
Gradually move towards a passive income
After doing successful blogging for some years you will reach a stage when you are not required to put much energy and effort in blogging as things will gradually start working smoothly towards a passive income.
Passive income doesn’t mean that you will stop working on your blog but what I mean here is that you will outsource most of your work like content writing, email outreach, link building, image and infographic related works etc. and make money passively.
Disclaimer: I have recommended some products in this blog with affiliate links in it. Although the products that I’ve mentioned in this article are being recommended by me after proper research. I will earn some commission without any additional cost to you if you buy some products through these links.
Now coming to the actual topic, “How to Start a Blog in 2022- A Step by Step Guide”
1. Choose a Niche before you Start Your Blog
You have to choose a niche to start a blog. The niche of your blog is the topic on which you will be writing about in your blog.
It can be cooking, news, travel, fashion & lifestyle, health and nutrition, technology or any other niche.
Authority Blogs or a General Niche Blog
Your blog can be an authority blog focusing around a single niche or topic or a general blog covering many topics like tech, health, fashion & lifestyle.
Focusing on a particular topic will eventually bring authority to your blog on that topic and also it will be less challenging from the SEO perspective to rank your blog.
Nomadic Matt (Travel), Life on the Balcony (Gardening), Nerd Fitness (Fitness) are some of the examples of niche blogs.
Blog’s Niche based on your interest versus it’s revenue potential
We often hear blog mentors talking about choosing a niche based on your passion and interest because passion will lead you to write continuously and consistently.
But I personally find that it has some flaws as most of you guys start a blog to generate earnings but if you choose a topic which does not have any online demand or which do not have affiliate earning potential you will eventually quit blogging although you might have interest to write about it.
I am not saying that everyone will do that but practically the majority will do that.
If your blog’s niche is around a topic which has most search potential and also has tremendous scope for Affiliate earnings your blog will succeed and you will develop interest in the topic once earning starts.
Ultimately it’s money that will drive passion in long term and consistent blogging. Once you earn you will learn too and also lead yourself to upgrade your skills. The point is you will stick around blogging because of income and that’s the fact whether you accept it or not.
In the light of the above analysis your blog’s niche should be based on:
- Affiliate Marketing Potential
- Keywords Search Volume
- Your Ability to Work on that Niche
Affiliate Marketing Potential
Affiliate Marketing is all about:
- Promoting physical products/software/services in your blog.
- Putting affiliate links of those products/software/services in your blog article/content.
- If anyone purchases an item through your link, you will get some commission.
The more you have traffic in your blog the more clicks you will get resulting in more purchase and commission.
Determining a niche’s Affiliate Marketing Potential
You need to check whether in a particular niche you can create blog posts and articles where you can promote some products as a solution to the reader’s problem.
For example, if you start your blog in a fitness niche and write an article on “10 Tips on How to Lose Weight in 2 Months”, You can easily promote some dietary products or weight loss machines in the article. This is an example of Affiliate Marketing Potential blog.
Similarly, you can make a note of some niche’s and check over the internet whether it has Affiliate Earning Potential
First Method
You can simply type the relevant keywords for a niche and visit the top blogs of that niche. See whether those blogs are promoting any affiliate products
Second Method
Go to Affiliate Marketplaces like ClickBank, ShareASale or Commission Junction and search for products on different topics.
You will find a variety of products showing you its conversion potential and commission percentage making it easy for you to decide your niche.
You can use these two methods to find your initial niche idea. You can also make an excel sheet to compare different niche product’s conversion and commission rate and choose your ideal niche.
Side Note: After choosing your ideal niche work on your blog in the following manner:
- Publish Niche Based Content highlighting problems and giving solutions
- Make readers join your email list through free guide, checklist or course
- Send emails to them with Affiliate Product Offers as a solution their problems
You can check the content of your competitors blog and join their email list to get an idea of what products to promote.
Based on my research here are some of the profitable niche that have Affiliate Marketing Potential:
Home Security, Travel, Home Décor, Gardening, Deaddiction Consultation, Fitness, Baby Care, Education, Web Hosting, SaaS, Organic Food
Find High Intent Keywords Potential of a Niche
These are high commercial intent keywords which signifies the person’s strong intent to buy a product or a service or an action that will eventually lead to a sale.
To simplify further these are keywords through which you can determine the user’s intent to buy a product. These are simple queries which can be termed as transactional queries of users which have the most buyer intent behind them.
Examples of High Intent Keywords
Best Video Editing Software, Buy Black Shoes, Best Page Builder
These keywords suggest that a person is looking to buy a product and if you are able to rank your article on these keywords users will visit your site and after reading all the reviews, pros and cons and its features some of them will purchase the product through your affiliate link generating a commission for you.
You must know that online purchase is influenced by affiliate articles showing reviews of products. People want to learn about the product before they purchase it.
Your article should be thorough with reviews of the product, features and its pros and cons with a proper guide helping the reader to buy the product.
Unlike high volume low intent keywords, high intent keywords gives you more Affiliate Earning Opportunity as the intent of the user is to buy but you also need high search volume articles to drive traffic to your blog although they may not bring much sales.
Keywords Search Volume
The second important thing to consider before choosing your blog’s niche is whether the topics related to the niche have substantial online query as it is useless and a waste of time if you work on a project and write articles and blog posts spending your precious time with not many readers for that.
To identify topics which have more query you have to look for high search volume keywords as high search implies more demand.
But you must understand that high volume keywords have high, medium and low competition keywords.
You are not required to consider this for your initial pillar posts but once you are ready with your pillar posts look for high volume low and medium competition keywords and also long tail keywords so that you can easily rank better and start your earning journey through your blog.
And for all these you have to do Keyword Research.
Keyword Research
For deciding your blog’s niche, Keyword Research is a vital task that must be done to identify and choose proper keywords. It helps you to understand the keywords, its search query and its competition better.
Keyword Research is not only about finding search volume for a particular keyword but rather it is exploring its potential to drive traffic and generate revenue for your blog. It is a long-term strategy that has to be applied by you to succeed.
Keyword Research can be done through these methods:
Free Method
Uber Suggest is also a similar tool which allows you to search few keywords for free. You can try it for free at present as perhaps they may make it a paid tool after sometimes.
Google Keyword Planner and Keyword Tool are also good free tools to find relevant keywords, search volume, competition and CPC (cost per click). Although Google Keyword Planner is mostly used by advertisers and marketers to get valuable keyword data, it can no doubt be used for deciding your blog’s niche and for proper keyword research.
You can also use Google to identify relevant keywords while deciding your niche.
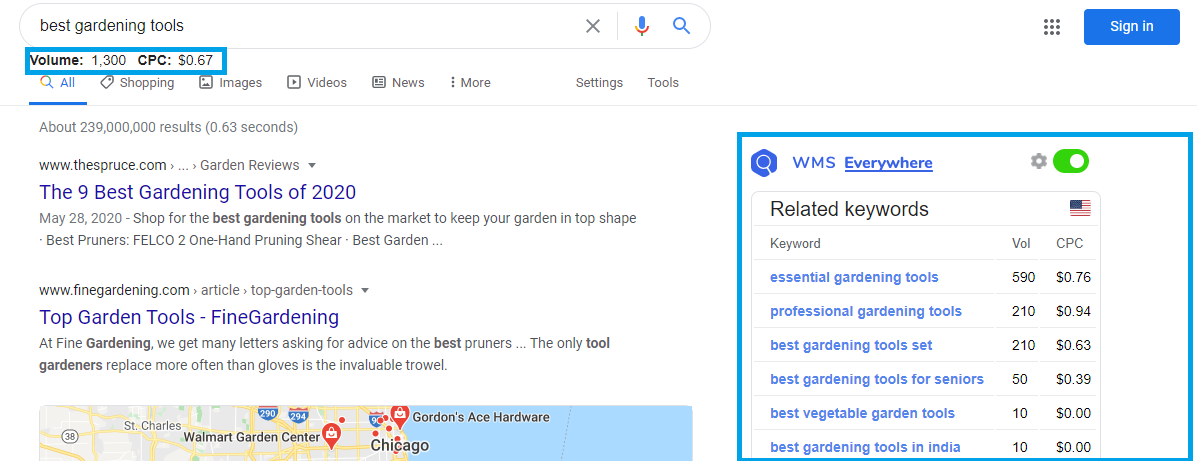
Just type a particular keyword in the search bar and you will see a list of keywords results which people mostly search in Google. Here is an example:
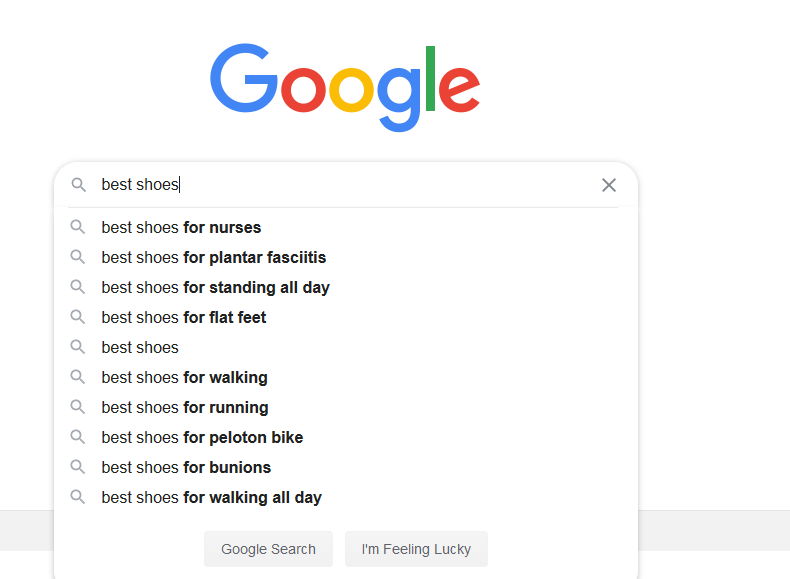
Source: Google
Here I have typed best shoes and Google is showing results of most relevant searches in this niche. So, if I choose shoes as my niche, I can get an idea about different articles and blog posts which I can write and promote affiliate products therein.
Similarly, if you type a particular keyword in google bar and hit search you will be able to see below the page similar keyword suggestions by Google. See this example:
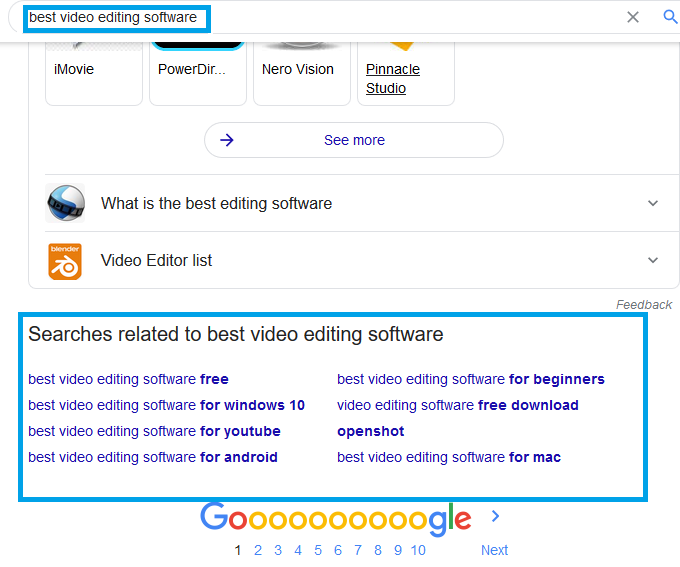
Here I have typed a keyword “best video editing software” and you can see in the image, the search related to it.
Since the Hummingbird Update in 2003, Google has become smarter and are more on identifying the user’s intent behind their search queries.
While showing search results Google displays a “People Also Ask” box where you can see questions posed by users related to the search query. You can target the right questions and can use them for selecting your targeted keywords.
If you apply these simple methods it will help you in deciding your niche and topics for your blog posts.
Another free tool for keyword research is a chrome extension “WMS Everywhere” which helps in getting keyword metrics like keyword’s search volume, CPC (cost per click) and related keywords for a particular search.
It is an amazing free tool which can be used by beginners for finding an ideal niche and for keywords research.
Lastly you should not underestimate Quora, Google Trends, Yahoo Answers and AnswerThePublic as they are alternative free potential tools where you will find long tail keywords with less competition.
Quora is a very effective but most overlooked tool to find potential keywords. Just type a relevant keyword in Quora and you will be able to see numerous questions that people ask in Quora and those questions can be very helpful in determining your niche related keywords.
Paid Method
You can use tools like Ahref, SEMRush or Moz to do Keyword Research. These tools let you explore keywords and give you information about a particular keyword:
- Monthly Search Volume,
- Average CPC (cost per click),
- Keyword Difficulty
This will help in deciding your perfect niche and also articles related to the topic with low and medium competition keywords.
You can also try BuzzSumo where you can get content ideas for finding trending topics in different social media platforms.
Although these are paid tools but offer a good value for money. SEM Rush gives a 7-day free trial whereas Moz gives a 30 day free trial to test their tool. You can give a try with these tools in order to decide the better one for you.
The third and final factor to consider before you decide your blog’s niche.
Your Ability to Work on that Niche
Often people do not assess their ability to write on a particular topic and simply start a blog on a particular niche.
Initially they put some effort and are able to write a few posts for the blog but as time passes it becomes very difficult for them to write quality content on topics related to that niche.
This is because they did not assess their ability before deciding the niche for their blog.
As I have mentioned earlier that it’s not about ‘interest on a particular topic’ but the fact is that if you are able to generate money from your blog you will slowly develop interest in it.
Money drives passion and interest but it is also equally true that self-assessment of one’s ability on a particular topic is also important.
Some niches require professional expertise which is almost a precondition to writing authority and quality content. In most of the cases you can simply get some training or education in that niche but still your ability is a primary factor to continue blogging on that topic.
You must do a pre assessment even on your ability to learn and grasp things on that topic. It’s very important.
I am not saying that you have to be a perfect person full of knowledge on a particular niche before you jump in to create a blog but do some pre assessment and if you are confident you can definitely go ahead.
Summary
We have analyzed above that for choosing a niche for your blog you must ascertain its Revenue Potential and for doing that these three factors must be considered:
- Affiliate Earning Potential
- Keywords Search Volume
- Your Ability to Work on that Niche
Once you understand these concepts you will take your first positive step towards a successful blogging career.
2. Pre-plan your Blog’s Launch In 6 Steps
A big mistake is to jump on launching of your blog without any proper pre-launch planning. Haste decisions have adverse effects and it applies to blogs too.
Before you step out to buy a hosting and register a domain name you need to make a full proof plan for your blog’s launch.
After choosing your blog’s niche the second important thing for you is to make your blog’s goals and targeted tasks to achieve your goals.
Proper planning is the essence for a successful blog launch.
6 Steps Plan to launch a blog successfully and gain readers from Day 1.
- Set a launch date for your blog and make your goals and schedules accordingly which will not only help you do targeted work but will also make you more efficient towards achieving your goal. You ought to be relenting after a while if you do not have a launch date as it motivates you to achieve your goal.
- Write your blog’s pillar posts, at least 5-7 numbers with about 3000-5000 words to publish at your blog’s launch. 5-7 posts are a good number to launch your blog and you are not required to wait for the launch until you are ready with tons of articles.
It takes time for your articles to rank and you are required to regularly update your articles for gaining higher rankings in search engines and even your website authority increases with time.
So, it’s a good idea to launch your blog as early as possible even from the SEO perspective.
Don’t forget to do Keyword Research before you start writing as for your posts to get traffic it must include keywords which are searched online.
This is the strategy that must be adopted in order to successfully gain traffic for your initial posts.
Without adopting proper SEO (Search Engine Optimization) Strategies for your blog’s launch, your blog is probably not going to scale fast.
Your blog post strategy should be a proper combination of SEO optimized titles and subtitles, quality content and proper keyword inclusion (not keyword stuffing).
- Create and design Images and Screenshots for using it in your Pillar Posts and other important pages to make it visually appealing.
Images can either be taken from free stock photos websites like Pexels and Unsplash or you can design it with the help of a free tool like Canva.
Screenshots can be taken easily by Snipping Tool in Windows and you can use MS Paint for using arrows and boxes as highlighters in your screenshot.
- Create your Blog profile with an awesome Logo and an About Us Page.
A logo speaks a volume about your blog’s profile and is a sign of your blog’s identification. Your readers and customers recognize your brand by your logo.
It not only grabs attention but makes your blog’s first impression strong.
Your logo must be visually pleasing and simple making so that your readers may easily remember and recognize it as there may be instances where your readers may forget your blog’s name but will immediately remember your blog once they see your logo.
Once you’re done with the logo part head for creating an About Us Page. This page is mostly overlooked and is not written well by many bloggers as they don’t realize the fact that it is also crucial from the user’s as well as from the search engine’s perspective.
Visitors are keen to know about who you are and what’s your company all about. This page gives you an opportunity to introduce yourself and your service to your prospective clients.
- Create a free PDF Checklist, Books, Guide or a Course related to your blog’s niche as an offer to your readers to sign-up for your regular updates.Every blogger wants to increase email lists and to get more traffic and sales but getting people to subscribe to your email list is challenging.
But with lead magnets the challenge becomes easy as you are offering something for free to get readers sign-up.
Make a PDF that may be a simple e-book, checklist, video course, an auto-responder series for a week or any other resource material related to your niche that provides value to your readers and offer it free with your blog’s email subscription.
Free lead magnet is a great way to tremendously grow your email list as it encourages visitors to sign-up and submit their email addresses. This will help you in increasing your blog’s traffic in the long run.
- Make 2-3 Guest Posts ready for publishing in other relevant websites with links back to your site.
Why Guest Posts are important is another topic in itself but you must remember that if it is not on the list of your blogging goal you will be lagging yourself behind in building your blog’s authority.
Your blog may not rank initially but with guest posts you will get an instant traffic exposure through your links from other sites.
It also helps you in expanding your network and building relationships with people in your industry.
Wrapping Up….
Make your goals realistic, clear and achievable within the specified time frame and write it down somewhere for regular follow up.
Most bloggers do not realize that they are making mistakes with their websites and are over complicating things initially by trying to perform tons of tasks at once.
And another reason is that they do not think that they are launching a product to scale.
Bear in mind that you are launching a product and not just another blog.
Stick to your goals for blog launch that you’ve already planned and do not get distracted.
Once you launch your blog and publish your initial content you have a lot of time to do something new and important that may benefit your blog.
The final point is that although you are able to promote your content through your blog and upscale your business, a good plan is the base for a successful blog.
3. Decide a Domain Name for your Blog
It is very important for you to decide a right domain name for starting a successful blog.
Since the domain name is how your audience remembers you and your work you should choose a domain name which is simple and easy for your readers to remember.
You must consider two things Before Choosing A Domain Name.
Starting a Blog with Keyword Domain Names or Brand Domain Names
Generally, domain name is either keywords related to your blog’s niche or a brand name.
Keyword Domain Names
Keyword Domain Names like hotels.com and menshealth.com are undoubtedly informing their audience a general idea about their content.
There is a general impression that if you have a keyword in your domain name it will make it easier for your contents to rank but is it so?
Keyword Domains have little influence at present
John Muller has informed us that Keyword Domains have lost their influence years ago and having keywords in the domain name will not automatically rank a website for those keywords.
To have a proper balance, we cannot say that it has a zero impact from an SEO perspective because we can see even today Keyword Domains ranking in the search results for highly competitive keywords but that strategy is from the past and it is not recommended at present.
Based on the analysis of industry experts, the fact is that a keyword rich domain has little impact today on the rankings of your blog.
Moreover, Keyword Domains have other issues like:
It has become quite hard these days to get a good keyword rich domain as most have them have been either presently in use or are already booked by domain resellers who will sell the domain to you for an amount much higher than its original price.
A Keyword Domain Name can have some content restrictions stopping you from expanding your blog thereby making your outreach limited.
As in the above example of MensHealth.com and Hotels.com, Health and Travel are broader niches but Men’s Health and Hotels.com are categories of the broad niche.
These websites are limited to a particular category of a broad niche and they cannot make much expansion to reach the larger audience in their industry because of their domain names. MensHealth.com have to stick to health related contents for men and the same goes for hotels.com which again have to restrict its content to hotels and related products.
Brand Domain Names
Brand domain names on the other hand, having your brand name as your domain is a good idea as it provides a vast scope to build your blog.
Even if you don’t have a keyword in your domain name you can rank better in Google if you have a quality and highly optimized content.
Your blog’s domain name can be your name or your nickname or else a name which you want your audience to remember as your brand name.
Personal Domain Name Bogs are generally created with a purpose to offer services to a particular person whose name is either already having a brand value or that person intends to build his/her brand through a personal name blog.
Apart from giving information they even sell their own courses and books authored by them through their personal blogs.
A brand name on the other hand has much larger scaling potential and it is not centered around skills of a particular person.
There may be an instance that due to some odd reasons a person running a blog is no longer able to continue.
In such a case a general brand name wins the race as in their case skills, advice and expertise of different people can be accommodated in a single blog.
You can even have multiple trainees on your blog platform to teach your audience and also sell their courses.
Further if you have multiple blogs it would be practically impossible to make them personal domain name blogs.
Although there may be advantages and disadvantages in each of the categories, the best option is to go ahead with a domain with a General Brand Name.
If you’re still confused about naming your blog you can go ahead with your personal name as your domain without making this task further complicated.
.com or other domain extension to start a blog
Domain extensions are of different kinds, there are top level domains (TLD) like .com, .net, .org, .edu, etc. or country code domain extensions like .us for United States or .uk for United Kingdom, targeting a specific country.
The reason for you to choose a .com is that besides signifying a commercial aspect it is the most popular domain extension which was originally meant for commercial sites but now all types of sites use it as it is unrestricted and are liked by search engines.
Cost of a domain name is not a herculean task as there are plenty of sites available to purchase a domain name which may cost you generally between $10 to $20 depending on the registrar and type of domain.
But if you purchase a hosting for your blog with Bluehost you will get a free domain for the first year which means you can save some dollars when you begin.
It only costs $2.95/month (63% off on the hosting plan), use my link below. You can use my link here to purchase your domain from Bluehost at no extra cost for you.
Some brief tips for choosing the best domain name:
- Try to keep your domain name short, making it easy to grasp by your readers’ brains.
- Don’t try to coin a new word which is difficult to spell or pronounce as it makes it difficult for you to share the name with others specially while you are trying to dictate your business email over the phone.
- Don’t put hyphens, numbers or double letters in your domain to avoid confusion.
- If you are confused with finding the ideal domain name for your blog you can take the help of domain name generators like Nameboy and BlogTyrant for domain ideas.
If you have already decided your domain name you can sign-up for Bluehost with a free domain name.
4. Get a Web Hosting and Domain for your Blog
Web hosting is a service through which hosting companies allocate space on their servers for websites in order to make their files globally accessible.
You may wonder why you should invest in hosting and make a personal website when free platforms are available.
But gone are the days when bloggers relied on free hosting platforms like bloggers.com.
You can still use platforms like Bloggers and Medium if you are only passionate as a writer but if you’re serious enough and want to take blogging as your business then you have to invest in domain and web hosting.
Mistake in choosing a web hosting can lead to disastrous results resulting in slowing down your site and having 503 server errors regularly.
I have experienced it a lot. I faced site down issues many times with annoying 503 server errors.
Initially I searched the problem in my theme, plugins, images and other places on my site.
I did all kinds of optimizations and made my pages light but still that nightmare didn’t fade away.
Ultimately I found the problem and I was shocked!
It was my web hosting which was playing the devil’s role.
After trying everything I changed my hosting and it gave me satisfying results. My website pages started opening very in seconds and since then I haven’t faced 503 server errors.
To start a blog as a beginner, I highly recommend Bluehost to beginners for the following reasons:
-Basic plan is very cheap with a reliable service. ($2.95 monthly)
-You will get a free domain for one year along with the hosting which is a money saver for beginners
– C-Panel dashboard is simple and easy to navigate making it beginner friendly.
– 24×7 chat support to help you when you face any problem.
– Supports Multiple Applications and e-commerce plugins
– Fast web server and 99% uptime
– Recommended by WordPress since 2005
– WordPress Installation in just 1-click
– Free SSL Certificate
– 30 days Money-back Guarantee
Start your blog with Bluehost.
Now I will move ahead to show you a step by step process to purchase Bluehost Web Hosting with a free Domain Registration for your blog:
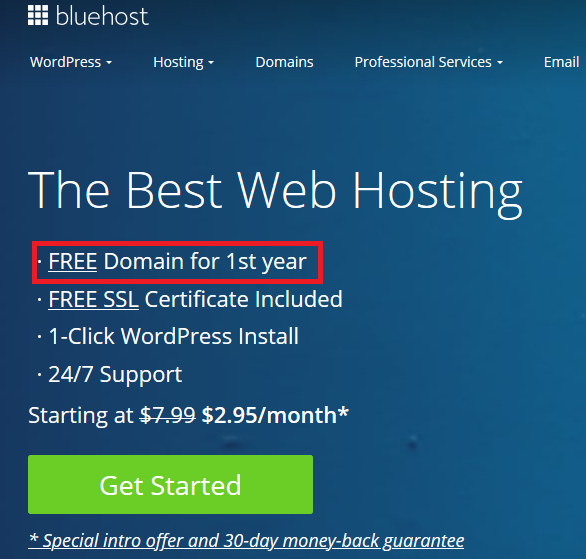
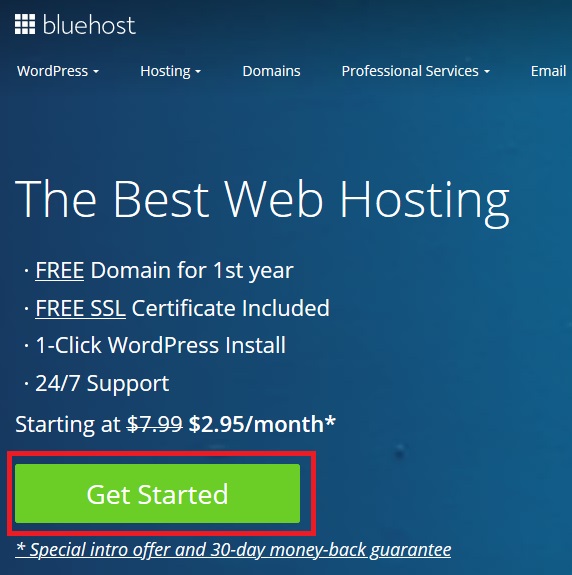
Step 1: Visit Bluehost Homepage
Visit Bluehost Homepage and click on the Get Started button.
Step 2: Select your Web Hosting Plan
Next you will see four different plans:
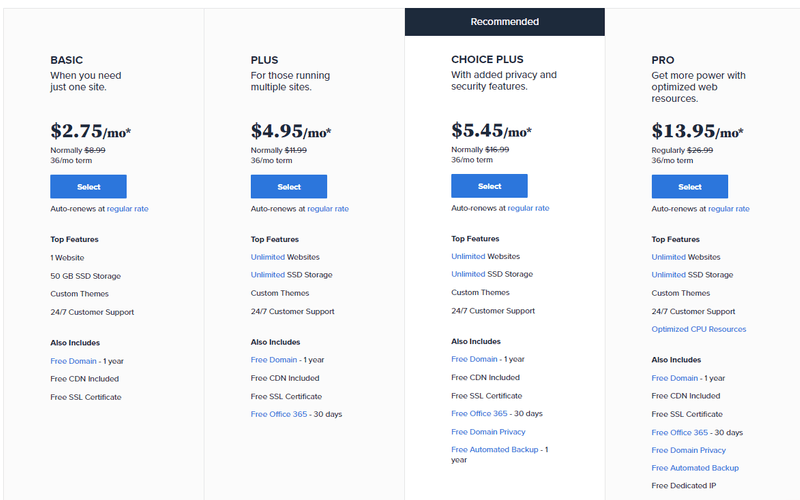
You can start off your journey with the Basic Plan having all the basic features but if you are intending to start one more website after sometime or need some extra features then you should select the Choice Plus Plan.
The Choice Plan allows you to host multiple websites and also provides a domain privacy feature which will protect your personal details which includes name, email address, phone number etc.
There is no such hard and fast rule and you can start with any plan by simply clicking on the “Select” button of the plan you intend to choose.
Step 3: Register Your Free Domain Name
Once you select your plan you will land up in this page:
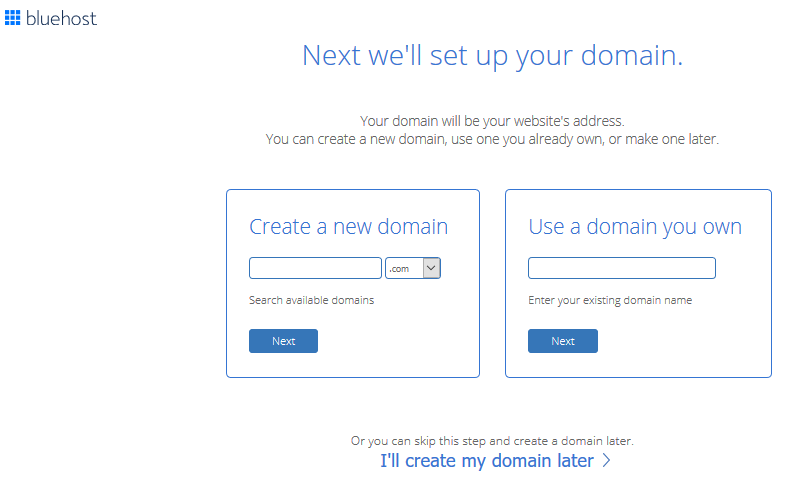
Here you are two options, you can either create your new domain or if you have already purchased a domain you can use it with your Bluehost plan.
For creating a new domain, simply enter the domain name and click next. If it is not used by anyone it will be registered for your blog which will be free for one year.
Please Note the following points:
-You can set up your free domain later if you are unable to name your blog.
-In case you have purchased a domain from somewhere else you need to change the name servers with your domain provider.
After registering your domain, you have to create your account by filling required particulars.
Step 4: Create Your Account
The next step is to fill up the details in the Account Information Section.
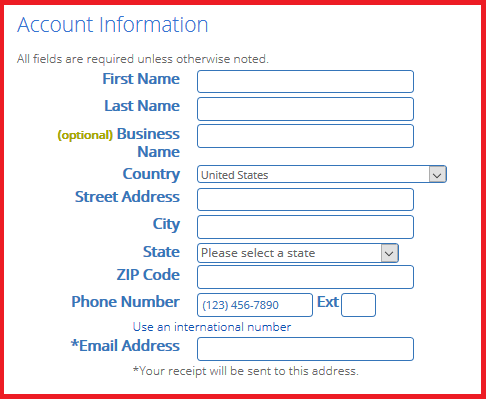
Verify that the details you’ve entered are correct like your name and a proper email address.
Next just below the Account Information Section there is Package Information Section where you have to select a period for which you need the hosting plan.
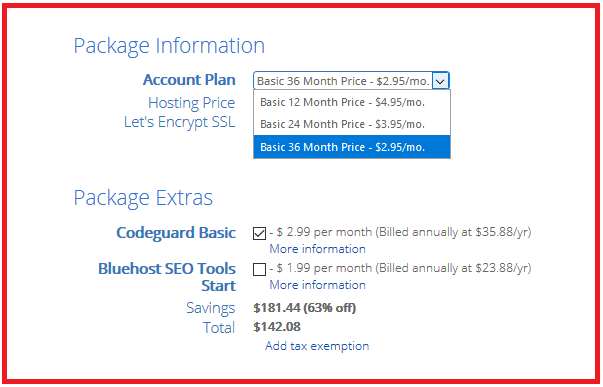
Here you have Account Plan options for either 12 months, 24 months or 36 months.
I’ll recommend you to go for the 36 Month Plan whether you choose a Basic or a Choice Plus Plan, as you are not starting your blog just for a short time adventure and you will also be able to save some money with that.
There is another section which is “Package Extras”.
Here Codeguard Basic can be done away with by simply unchecking it as it is not really required.
Now it’s almost done, you have to fill up your payment information.
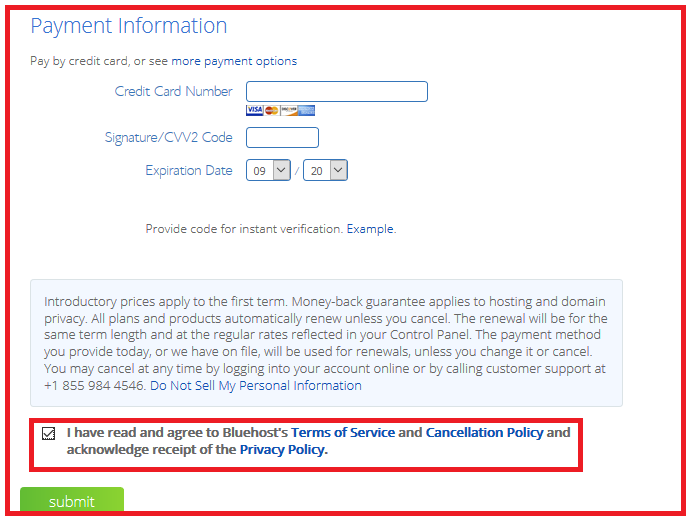
Here you are given different payment options to choose from. Once you fill the details and check the box as shown in the picture, click the “Submit” button.
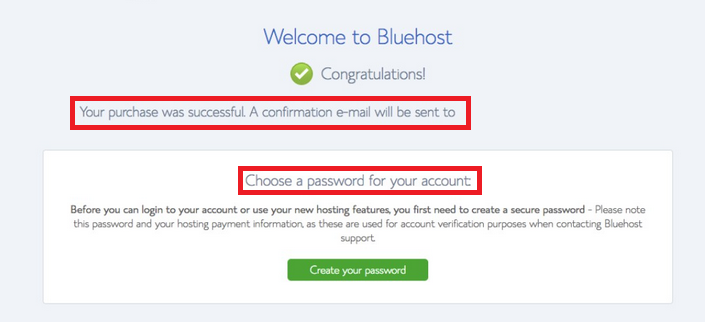
You have now completed the entire process and taken a major step forward in your journey to start your blog.
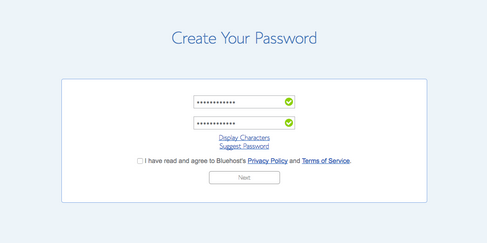
Confirm your Bluehost Account through a link which will be sent to your email and create your password for accessing your account in Bluehost.
Step 5: Log In to your Account
Log-in to your account by using your Email or Domain Name and the password which you created.
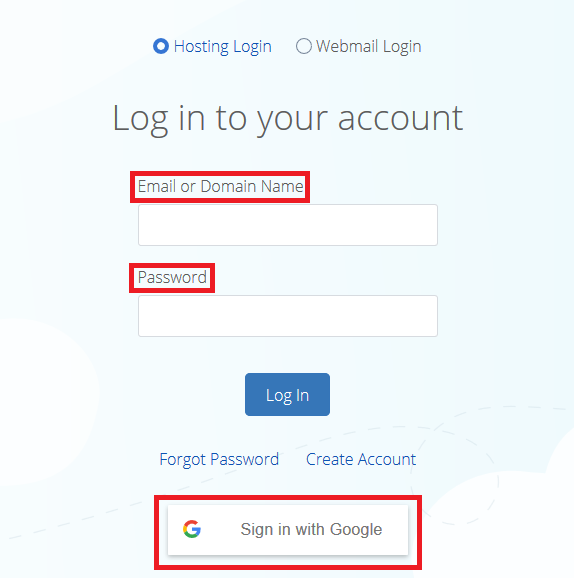
You can also sign in to Bluehost through your Google Account but it is preferable to use your custom credentials.
Have you made up your mind to start your blog? You can get started with Bluehost right now by following my above step-by-step guide.
5. Start a Blog with Bluehost and Install WordPress
After your first major step, now it’s time to install a content management system to create, customize, design and manage your blogs.
The ultimate choice is undoubtedly WordPress content management system.

The reason why you should start your blog with WordPress is that it is very easy to use and manage with flexibility in customization and design. Since it is an ideal blogging platform it has SEO benefits too.
Moreover, you have more control over it with an easy to use interface and awesome plugins. You do not need any coding skills to use WordPress.
This article on Why WordPress is the best CMS is worth reading.
There are other blogging platforms like Blogger, Medium, Tumblr and others but WordPress beat them all.
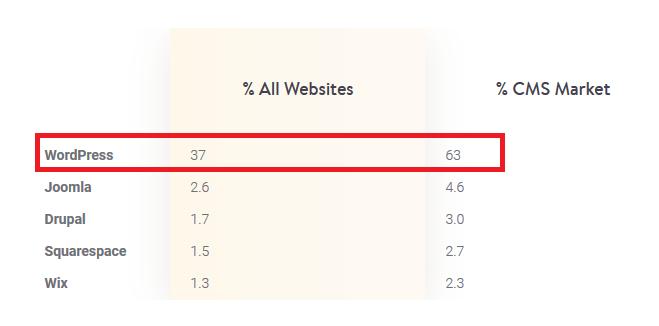
Source: Kinsta
Kinsta has come up with a report that almost 37% percent of all websites use WordPress and it has a share of 63% of the CMS market.
Before you start installing WordPress in your hosting account let us understand the difference between WordPress.com and WordPress.org. Although it might sound the same but there are differences between them.
Install WordPress.com or WordPress.org?
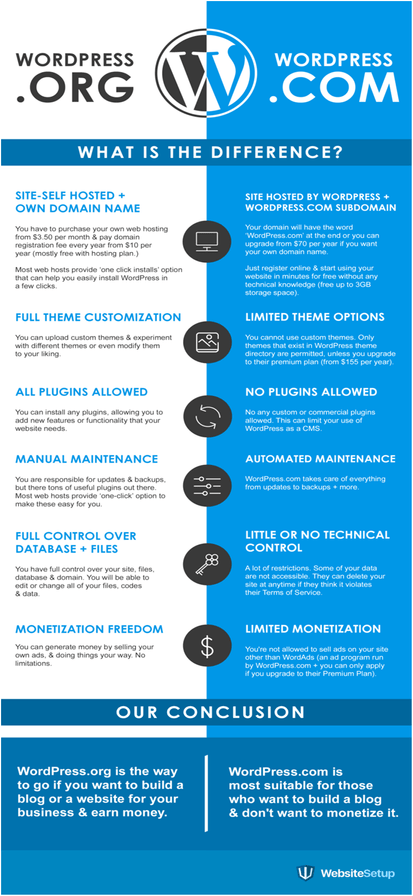
You should go with WordPress.org for the following main reasons:
-WordPress.org lets you self-host your blog with your own domain name.
-Full freedom to customize themes and plugin installations.
-Full control over your blog.
-Freedom to monetize your blog.
Install WordPress with just a click for your Blog
Bluehost provides you a feature of one-click WordPress installation for your blog. Simply Login and create your WordPress site with the click of a button.
After that you’re asked to pick a theme for your blog.
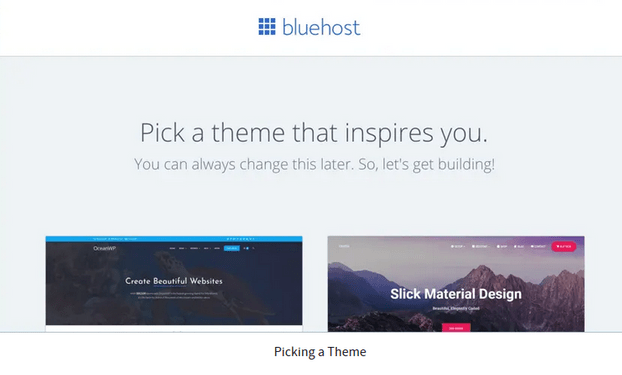
Themes are categorized in different categories like e-Commerce, Blog, Portfolio etc.
You can skip this step for the time being as it is advisable to first complete the initial site setup and launch.
Skip this step, go to the next page and click on the “Start Building” button.

Now you will enter the WordPress dashboard area with a welcome message where they will ask you what kind of site can they help you to set up, Personal or Business? You have the option to simply click on “I don’t need help”.
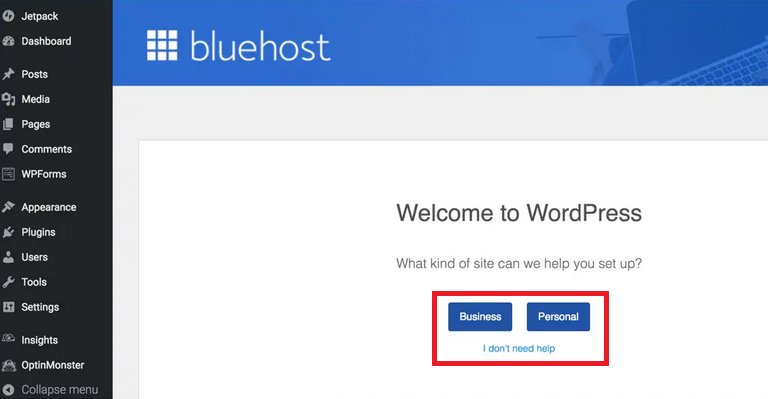
Next enter your “Site Title” and “Site Description” and click on the “Next Step” button.
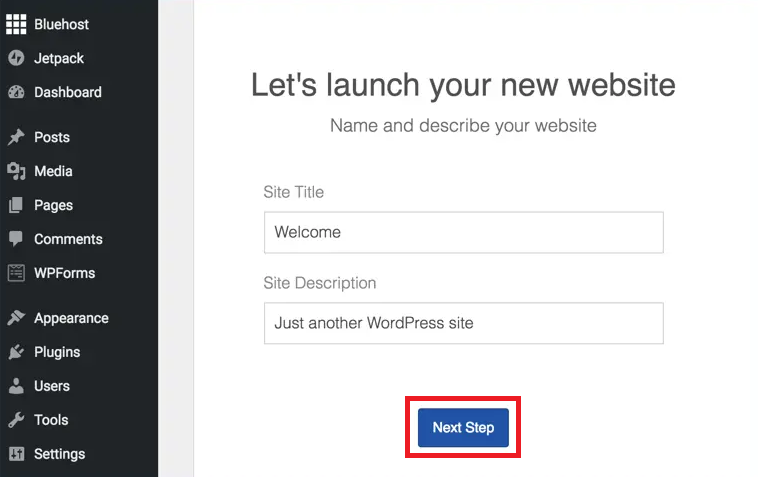
Next you will be asked to set up the layout of your homepage and other pages. You can skip and continue.
Once you are in the admin area of your WordPress you can see many options like customizing your site, creating pages and posts, layouts, media library and other features.
Use its features and practice it repeatedly to familiarize yourself with your new WordPress Dashboard and start designing your site which brings you to the next section.
Decided to start a blog? Start here at just $2.95 per month.
6. Design your blog with a WordPress Theme
Now it’s time to design your blog with a WordPress theme.
A well-designed Theme will make your blog different and unique to your brand especially when we have many different blog designs and themes over the web.
WordPress by default has a lot of free custom themes to choose from which you can use for your blog by easily installing them from your WordPress Dashboard.
Let me show you how.
Install your WordPress Theme
On your WordPress Dashboard you will see a screen like this:

As I have highlighted above, hover on the “Appearance” button and you will be able to see different options.
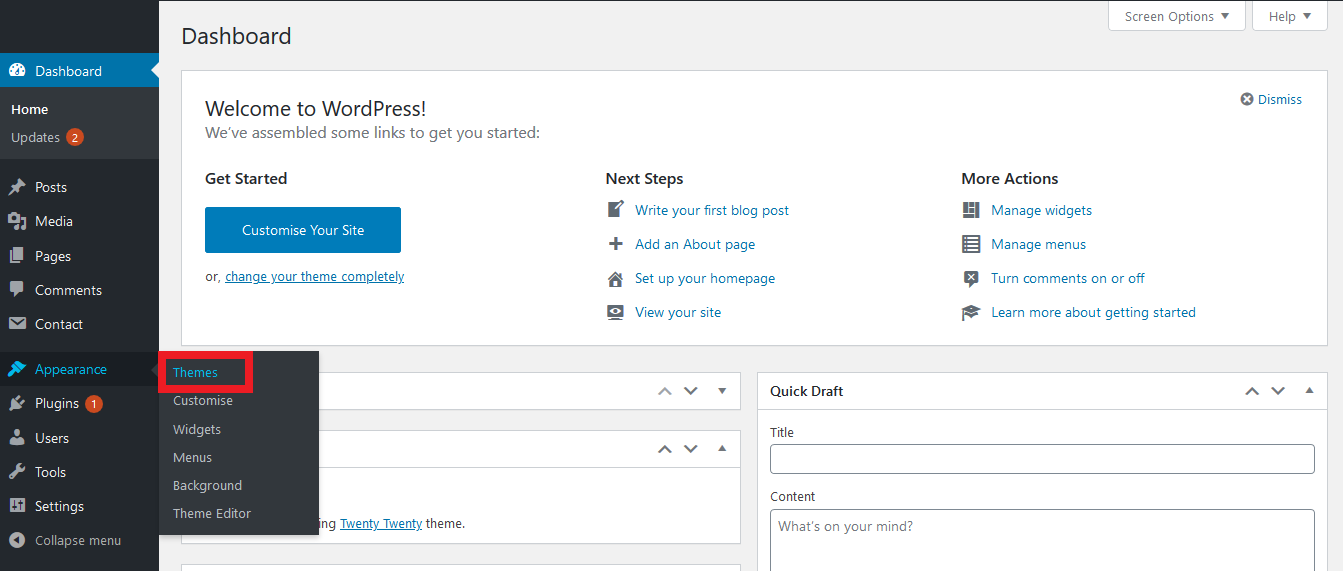
Click on “Themes” as shown above and you will enter the themes area of your dashboard.
Next click on “Add New” to look for different Themes
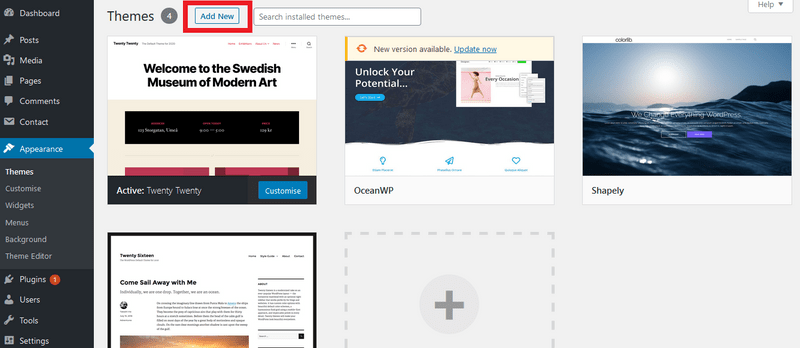
As shown below you will find a different collection of themes to choose for your blog and if you want to filter the Themes just click on Feature Filter.
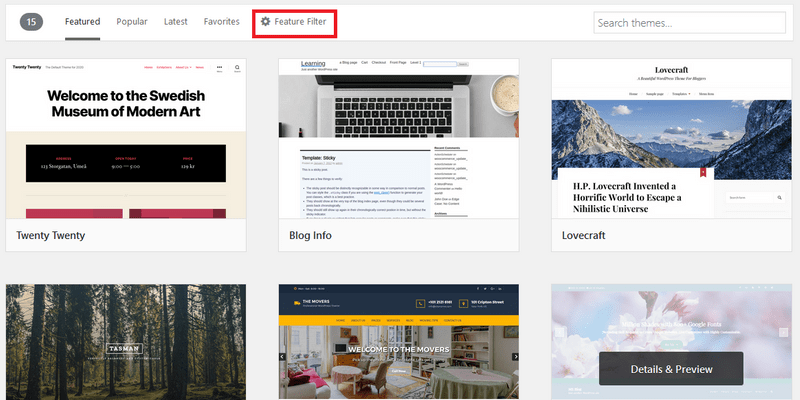
Once you click on it you will come to this page:
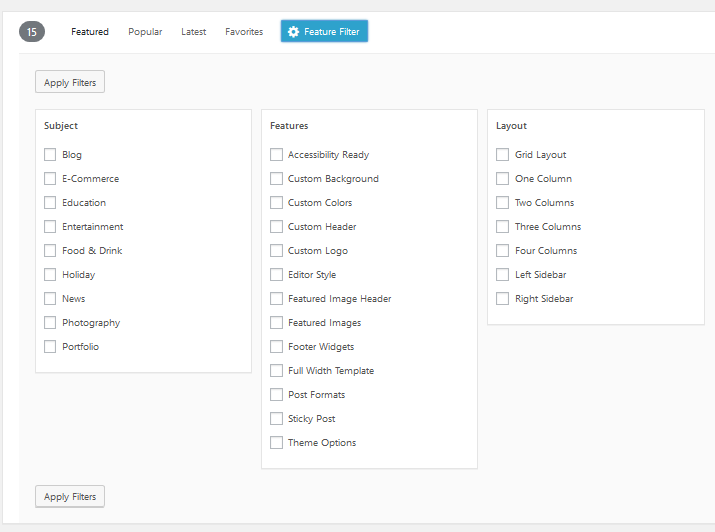
Here you can apply filters based on Subject, Features and Layout.
Things to remember while Choosing a Theme:
-Choose a theme which is responsive across devices.
(Use Google’s Mobile Friendly Test tool to check whether it is mobile friendly)
– Your theme should load fast. (Check it on Google Pagespeed Insights or GT Metrix)
– The design and interface of your theme should have an impressive first look.
– Your theme’s font should be simple and readable.
– Ensure that your theme is compatible with all popular plugins.
– Theme shouldn’t have unnecessary features making your site slow.
– It’s a blog, so layouts should be simple and easy to navigate.
-Test your theme with Theme Check plugin to see its conformity with WordPress.
– Before finalizing your theme do read its reviews.
In case you’re unable to find your ideal theme from the list of free themes, you can go for premium themes.
Premium Themes come with customer support and proper guides to install and design it. Since you pay for it, they have awesome designs for your blogs.
In premium themes you have more features and design options which is quite unlikely in free Themes.
But if you want to start simple you can always kickstart with a free theme initially and later on get a Premium Theme.
These are the some of the best places to buy premium themes:
Elegant Themes
Theme Forest
Theme Trust
Studio Press
Thrive Themes
Woo Themes
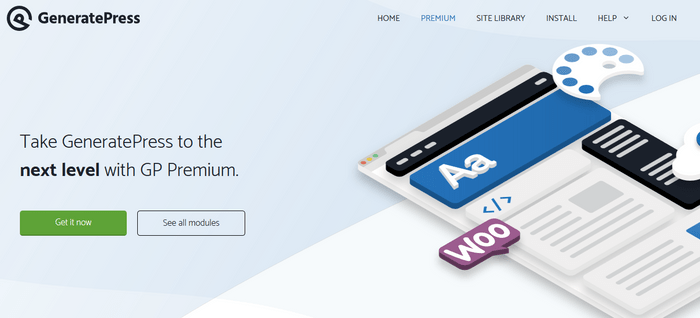
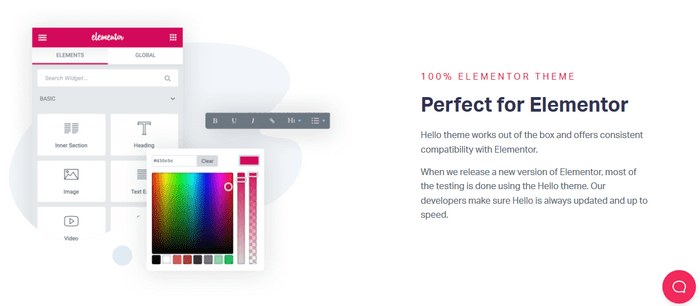
I recommend you to try Generate Press Premium Theme with Elementor Page Builder.
Once you purchase a premium theme you will have to download the zip file from the seller and install it from your WordPress Dashboard by clicking Add New and upload the zip file from your computer.
If you want to build and design your theme with some specific and custom features, I would advise you to hire a developer and he will take care of that.
You can hire them in freelancing platforms or can reach an expert directly through his blog or website. Charges vary as per expertise and efficiency.
The more you pay the perfect result you get in return.
The design part is not over unless you do some basic customization in your blog.
Customize your Blog
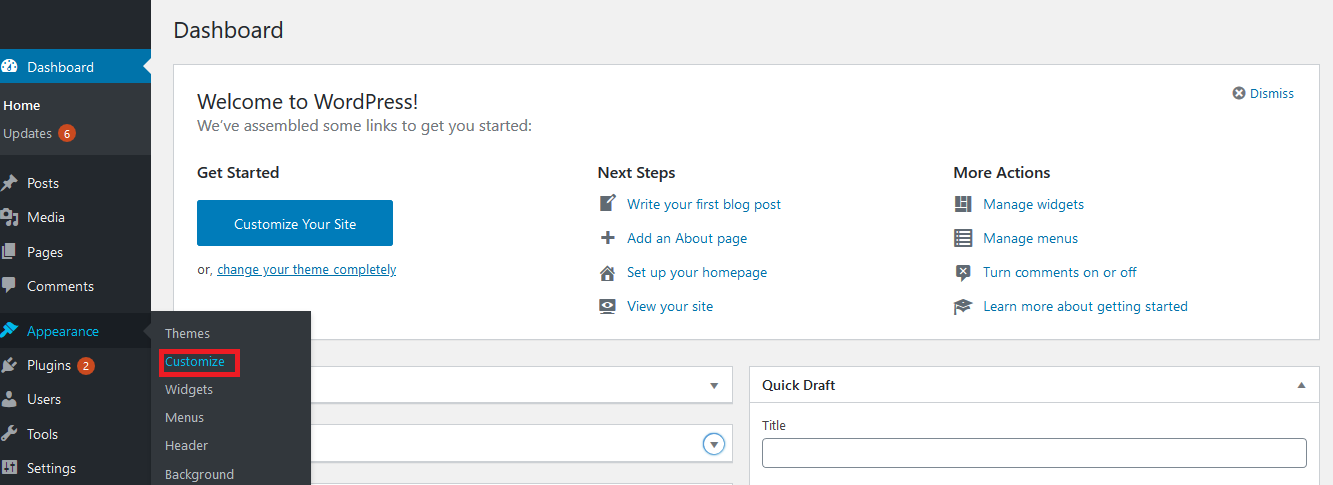
As shown above hover on “Appearance” and from the given options click on “Customize”. You will come to a page similar like this:
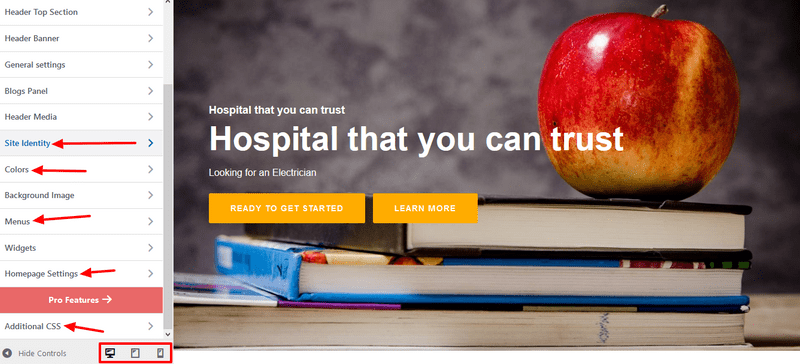
Please Note: Every theme has a different interface. The design on the right side of the screen shot above is different for different themes.
Once you are on this page you can do some settings to give your site a different look.
Site Title: It has multiple editing options for your blog. You can make a Logo and an Icon for your blog and also give a Title and Tagline. Remember to select a square Icon with at least 512 x 512 pixels.
Colors: In the Colors area you will be able to change the primary color of the entire Theme. Different color options with color codes are available. Apart from it color changes can be done for Theme Text Color, Header Text Color and Background Color.
Homepage Settings: Here you are given the option to choose what you want to display on your homepage. It can be your posts or a static page.
Additional CSS: In this area you can tweak and add your own CSS (Cascading Style Sheets) to design your appearance and layout of your blog.
Now that you have designed your blog with the right theme it’s now time to install all the important plugins required to scale your blog.
7. Install important WordPress Plugins for your blog
The best part about WordPress as a CMS (Content Management System) is that to improve the functionality of your blog you can easily install plugins with few clicks.
For beginners it is sometimes confusing to choose the best plugins for their blog since there are thousands of plugins in the WordPress library and multiple plugin options are available for doing the same thing.
So, I have come with my own list of important plugins which you should install in our blog.
My list of important plugins
Yoast SEO
Yoast SEO is a robust plugin which must be in your list of WordPress Plugins.
It is an advanced and user-friendly SEO plugin which helps in improving your ranking.
You can easily add your Meta Title, Meta Description through this plugin. It takes care of your xml sitemap, robot.txt with an ease.
It helps you to optimize your content with built-in suggestions and you can customize your blogs important SEO settings.
WP Rocket
Although there are free caching plugins like W3 Total Cache available but none can compete with WP Rocket.
It properly defers JS Loading and Minifies JavaScript, HTML and CSS, Optimizes Google Fonts and even has a lazy load feature for images.
It is the most powerful caching plugin which tremendously improves the loading speed of your WordPress site.
It is very easy to configure even for beginners and costs $49 per year.
If you are looking for a free beginning then you can go with W3 Total Cache which although is not like WP-Rocket but still the best free option.
OptinMonster
It will help you in growing your email list fast with brilliant features like modal pop-ups, page-level opt-in and exit intent opt-ins helping you to convert your visitors into subscribers and customers.
It is also very easy to use with its drag and drop builder to create visually impressive optin forms for your blog.
You can get started with OptinMonster with $9 per month.
Akismet
Akismet filters out comment spam from your blog posts and saves you from the hectic task of manually filtering comment spam.
Although it comes preinstalled with your WordPress installation but its importance made me to mention it here in my list in case you may uninstall it thinking it not to be important for your blog.
ShortPixel
ShortPixel helps in improving your page load speed by compressing all your blog’s images. It can compress images 90% without losing image quality. It compresses all types of images including JPG, PNG, WebP, GIF, PDF.
The reason for ShortPixel to be an ideal choice is because it is mostly automated
You can get started with its free plan which allows 100 images per month.
UpdraftPlus
In the age of vulnerability of websites your site can be hacked and you can lose your files and database. Hence a backup plugin is very important. It is a free version available.
It saves your backups in your Google Drive, Dropbox and other cloud-based storage and is a very reliable plugin.
It is a vital tool for taking care of all the backups of your blog. It creates automatic backups periodically with manual scheduling options and in case you lose something it can restore it with one click.
Easy Table of Contents
You can easily add a table of contents in your multiple blog posts with this plugin. It works easily with page builders like Elementor, Divi, Visual Composer and many others.
It is a free plugin which automatically generates Table of Contents for your blog posts and pages but also gives to manually modify it. You
You can change background and link colors and also use numbers or designs for your bullet points in the TOC.
The best part is that you can also keep the TOC in the sidebar as a widget which helps in increasing users engagement with your post.
WP Downgrade Plugin
If you are finding the new Gutenberg editor annoying while creating your posts you can fix it by reverting to the previous version of WordPress using the most popular WP Downgrade Plugin.
Do not forget to backup your site before performing the roll back as a precaution.
BigCommerce
If you will be selling products in your blog be it physical or digital you get started with BigCommerce easily as you do not need to do any set up. It automatically manages backup and security. It works seamlessly with WordPress.
Elementor Pro
Although it has a free version but the reason for recommending Elementor Pro is that it takes your page design to the next level. You will be able to work with more than 50 top notch widgets including media widget, menu widget, single post widget, marketing & conversion widget, search bar and more.
You can create and design awesome forms and popups for high conversion. If you are a beginner and want to create a unique and beautiful layout for your blog with ease you can go with Elementor Pro.
You can buy Elementor Pro for $49 per year.
Extended Widgets
With the help of this plugin you can create custom alignment, restrict widgets as per user role, make widget fixed/sticky and control your widget appearance very easily.
Generally, you see a blog having a sticky or fixed Author Bio or Table of Content in the sidebar, you can do that with the help of this plugin.
It perfectly integrates with WordPress and is the ultimate Widget Control Tool.
Mammoth .docx Converter
This plugin converts .docx documents into html very easily. Once you finish your article you can put them into your posts or pages through this plugin.
One of the features of Mammoth is that instead of exactly making a copy of the text size, font or color it converts paragraphs from Heading 1 to h1 elements making it easy for you to upload your word documents without any hassle.
It is an open source plugin and can be downloaded for free.
When your blog posts are shown in search results it usually shows the published date of your blog post as WordPress by default does not have an in-built feature to display the last updated date. This tends to make it outdated in comparison to newly published posts in the same topic.
Instead this plugin displays the updated date which means it shows the date when the blog post was last updated/modified which gives it a fresh look.
This freshness grabs the attention of readers and thereby boosts your blog’s rankings. It is a free plugin.
GDPR Cookie Consent
Through this plugin cookies will not be rendered by default but only upon user consent making your blog GDPR compliant for readers in the EU with options to Accept or Reject cookies. It is a free plugin.
Thirsty Affiliates
This plugin is very helpful for Affiliate Marketers. You can change your long ugly affiliate links full of numbers, strings and texts into shorter pretty links.
Take an example:
General Affiliate Link: https://bluehost.com/?aff=29e1c59be16c852
With Thirsty Affiliates: https://yourblog.com/recommends/thirstyaffiliates
The second link looks cleaner and has a better conversion rate and the redirects protects your links from malware. So, if you are into affiliate marketing you should have this plugin in your WordPress.
Now as you have understood the importance of these plugins and would want to install it in your blog, let me show you how you do it.
How to Install Plugins in your WordPress Blog
It is very easy to install plugins in your blog. Just go to dashboard and on the left side hover on the Plugins as shown in the screen here:
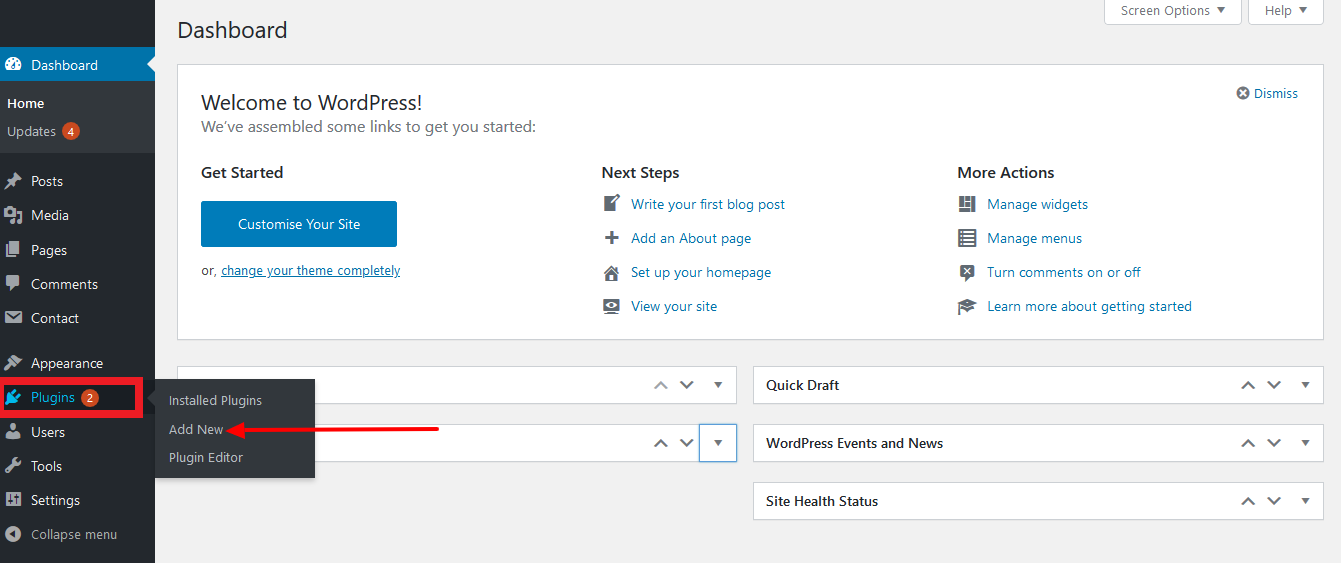
Click on “Add New” and you will be taken to the page below from where you can search and install your desired plugins.
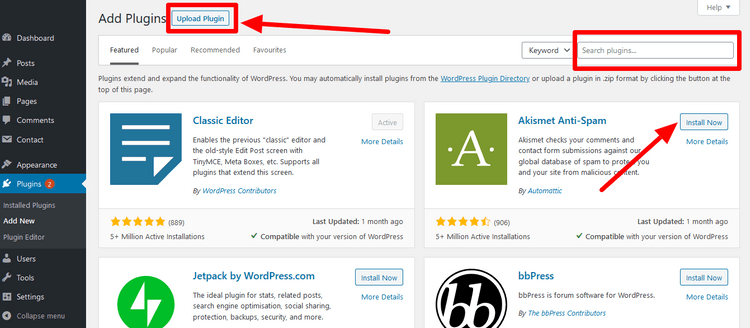
A search bar is given on the right side to search a plugin from the plugin library. You can install a plugin by simply clicking on the “Install Now” button and thereafter “Activate” button.
Once you activate a plugin its functionalities will be shown in the left side of the dashboard from where you can configure and use a plugin.
If the plugin is premium/paid you can upload its zip file form the “Upload Plugins” button as shown in the top of the screen above.
Having said that you are not advised to install many plugins in your blog as it can hamper your site performance by slowing down your blog.
Now you have completed the major steps of creating your blog.
You started by selecting your niche and rolled out a plan for your blog’s launch. Then you chose a domain name for your blog and purchased your hosting from Bluehost with a free domain. Thereafter you’ve completed your WordPress installation and designed your blog. You’ve also installed your necessary plugins.
The remaining steps are also vital for launching your blog launch which includes adding Analytics and Tracking your blog’s performance, doing some basic SEO settings, creating and growing your content and monetizing your blog.
Let’s complete some final steps before you launch your blog.
8. Integrate Google Analytics and Google Search Console with your Blog
Google Analytics and Google Search Console are important tools for your new blog and both these are free tools. You must integrate it with your blog for your blog’s optimum performance.
Let me highlight you the benefits of installing both the tools.
Google Analytics
Google Analytics tracks the number of visitors coming to your site at any point of time. It is a tool developed by Google which helps you to track your website from different metrics like:
-Real Time Users
-Demographics of your visitors
-Traffic coming from Social Media
-Browser used by your visitors
-Devices used to visit your site, like mobile, desktop
-Identify which of your pages and blog posts are receiving most traffic.
Among many other metrics.
It is a very vital tool which if installed from the beginning will store all your blog’s data.
As a beginner it will be very helpful in boosting your morale when you do not have many visitors and you see your visitors growing day by day.
You can measure your blog’s growth and work accordingly.
Here is the step by step process on how to integrate Google Analytics in your blog:
Step 1: Sign-up for Google Analytics
If you have a Google account you can simply sign-up by simply going to Google Analytics Page. Once you are there, click on “Start Measuring”.
Step 2: Create your Account
On the next page for creating your Google Analytics Account provide your Account Name which will be your blog’s name. Thereafter click the “Next” button.
Step 3: Choose what you want to track
In this page you will know whether you want to track your website or a mobile app or a combination of both.
You can choose the web as you want it for your blog and click “Next”.
Step 4: Fill all your blog details
Now you have to fill details like your blog’s name, url, industry category and your reporting time zone.
Finally click on the create button.
Step 5: Install the tracking code into your blog
After creating your account, you will be given a unique tracking code which you need to paste on your blog and it’s done.
Your blog is now integrated with your Google Analytics Account.
Google Search Console
This is another great tool by Google which will help you to monitor your blog and improve your performance on Google Search. This tool tells you what Google thinks about your site.
Reports given by search console will help you measure your blog’s search traffic, performance, fix your pages and posts issues and optimize your blog. You can also check your blog’s performance on mobile devices.
You can submit your site map and also index your blog pages with the help of this tool
It was known as Google Webmaster Tools until May 20, 2015.
Here is the step by step process on how to integrate Google Search Console in your blog:
- Sign-in to your Google Account and go to Google Search Console.
- Click on “Add a property”.
- A drop-down Menu will appear, choose “website” and put the URL of your blog and click “Continue”.
- Now you have to verify your blog and this can be done through various methods like:
-Adding an HTML Tag (adding a meta tag to your blog’s homepage)
-Uploading an HTML File to your blog
-Verifying through Sign-in to your domain name provider
-Using Google Tag Manager Account
-By adding Google Analytics code.
If your blog supports both http:// and https: you have it add both as separate properties and add all domain variations like http://yourblog.com/, https://yourblog.com/, http://www.yourblog.com/, https://www.yourblog.com/
Congratulations! Your blog is now integrated with Google Search Console.
Apart from Google you should submit your site to Bing and other popular search engines for maximum visibility.
Now it’s time to do some basic SEO settings for your blog.
9. Do Basic SEO Settings For Your Blog
There are certain basic settings which you have to do for your blog.
Permalink Settings
A Permalink is the URL of your blog post or a page of your blog which is static as well as permanent. It includes your domain and the slug. Each of your posts will have a different permalink.
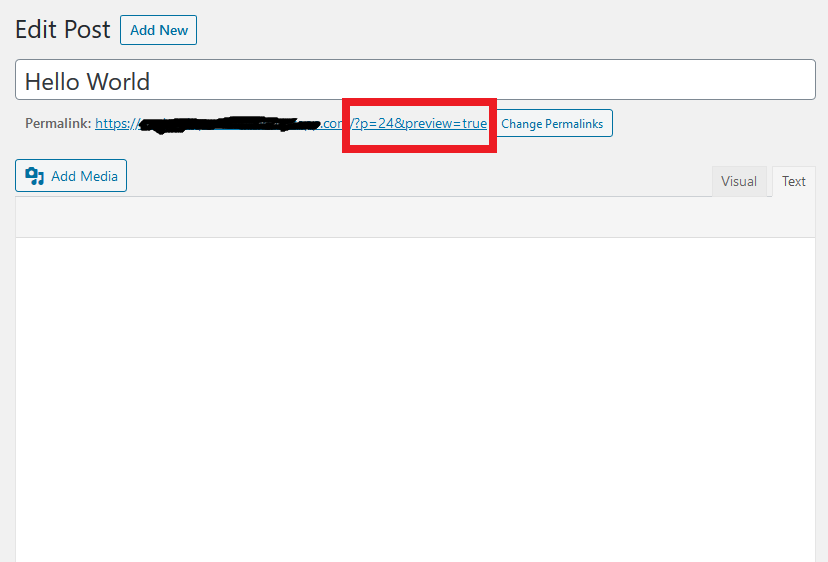
By default, your permalink is set to the Plain (post id) which means whenever you create a blog post your URL will look something like this:https://yourblog.com/?p=123
It looks awkward for your visitors and even Google hates that.
You have to set your permalink to post name and once it is done your post URL will look something like this:https://yourblog.com/sample-post
You can change the permalink settings on your WordPress by going to Settings -Permalink as shown below.
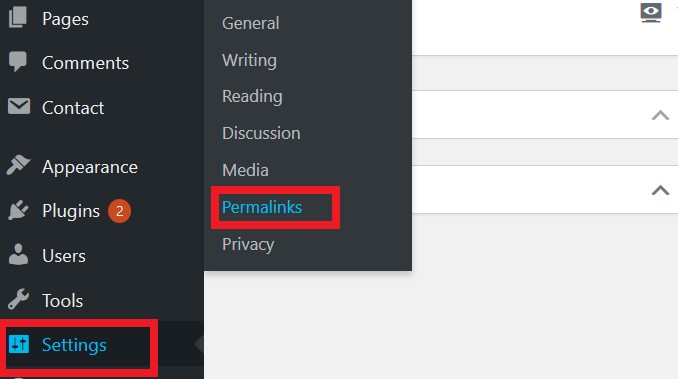
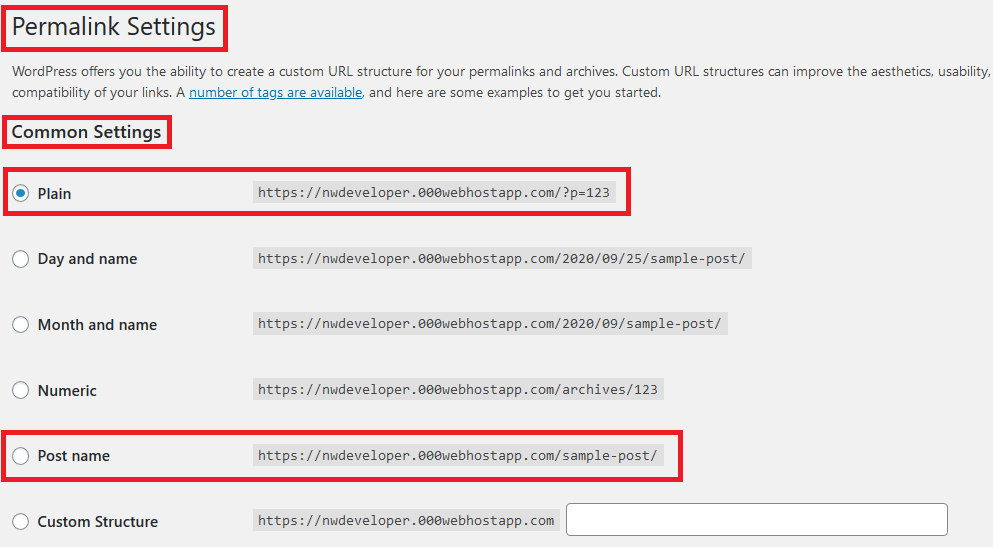
Here inside Permalink Settings you can see Common Settings where you can change the URL from Plain to Post Name.
From the SEO standpoint you have to rewrite the permalink structure of your post and even because Google has advised it in order to help search engines find your blog.
Therefore, it is advisable as a best practice in SEO that your posts URL should have the keywords related to your post.
10. Create pages and posts for your Blog
As you’ve completed all the basic steps to start your blog, now let us dive into creating pages and posts for your blog.
But before that you should know how to write quality content.
Basics for Quality Content Creation
Just writing a post is not enough; rather your blog post should be SEO optimized quality content in the eyes of Google as well as your visitors.
Go through the following points to understand the basics of quality content:
-Find proper keywords for your different blog posts through Keyword Research.
– When you write a blog post its URL should have the targeted keyword of your article.
-Put your primary keyword in the Title First and Second Paragraph.
– Also use keywords in conclusion apart from putting it in between the paragraphs.
-Maintain the keyword density of 1-2% in your post.
– Do not put the targeted keyword more than one or two times per hundred words.
-Include your primary keyword in your Meta Title and Meta Description.
-Use H1 tag in your Title and H2, H3 tags in your subheadings.
-Avoid thin content and at least write 2000 words.
-Keep your content different and unique from others for an ultimate user experience.
-Avoid making grammatical mistakes and write well framed content.
-Pick the right fonts and avoid writing long paragraphs.
-Write 2-5 lines of paragraphs with proper space to increase the readability of your blog.
-Write bold subheadings after every paragraph
– Bold subheadings work as speed breakers and increase user engagement.
– Use Bullets and Numbering in between your article to increase the reader’s engagement.
-Interlink your blog posts to reduce your site’s bounce rate score and use anchor text.
-Give some external links to high authority sites.
You can use some of the best SEO Tools to optimize your blog post.
Write Posts based on User Intent
Search in Google to see what users are searching in your niche.
You can target certain keywords which most of the users in your niche are looking for. Once you find the topic you can write a detailed blog post based on those keywords.
You can also check out “People also Ask Section” in the search results where you will find some questions posted by people related to your niche.
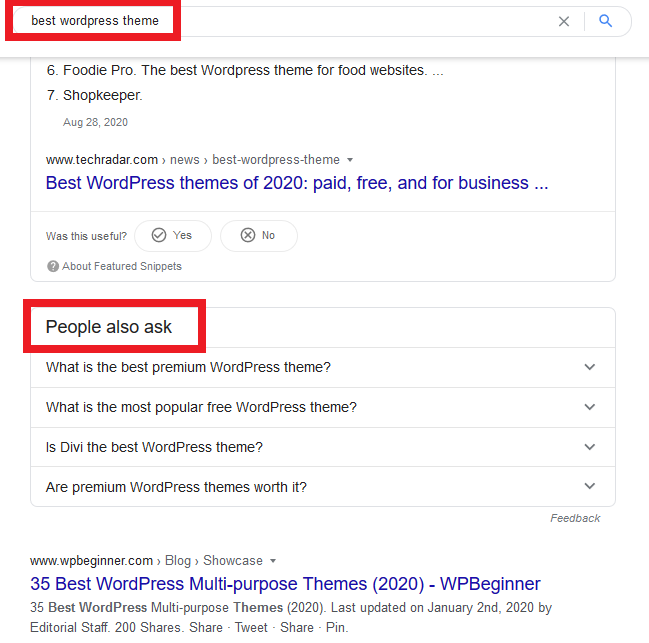
This will help you in identifying what users want to know in your niche and you can solve their problem by writing a post and incorporating those keywords in all the relevant places of your blog post.
As you can see in the screen, you can target commercial keywords with high user intent like “Best” or “Top” in the beginning which suggests that a user reads these blog posts with a buying intent.
Images, Screenshots, Infographics and Videos
Apart from text you must use quality Images, properly highlighted screenshots, Professional Infographics and Videos as these will help your blog post stand out in the crowd and will enhance the quality of your content.
Nobody wants to read a post full of texts instead an article having good images and tutorial screenshots, infographics and videos will keep its readers engaged which will increase their dwell time as well as ranking.
While you upload image, screenshot, infographic or a video:
- Add a relevant title
- Add alt text (Alternative Text), Caption & Description.
- Reduce file size for faster load speed.
- Maintain a similar image ratio for your images and screenshots.
Tools to Use for Writing Quality Content
- Grammarly helps you in highlighting grammatical mistakes in your blog post.
- Duplichecker can be used to avoid plagiarism in your blog post.
- Canva can be used for making featured images, Infographics, e-books etc.
- ImageResize.com for reducing and resizing images.
- Hemingway helps you in for text editing.
- Google Docs or MS Word for writing your content.
- Snagit for taking and editing screenshots.
Now that we have already learnt about writing an SEO optimized and quality content blog post.
Let us start writing Your First Blog Post
In your WordPress Dashboard on the left side hover on to “Posts” and click on “Add New”.
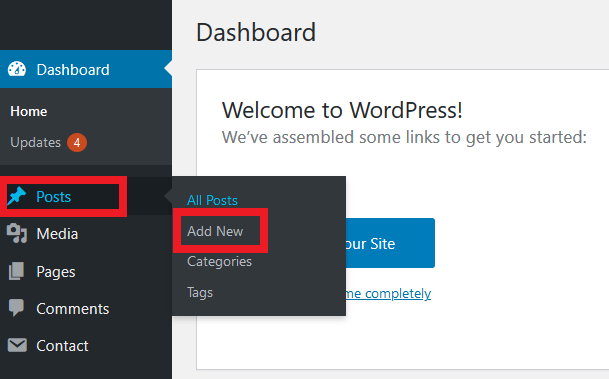
After you click “Add New” you will come to a page like this:
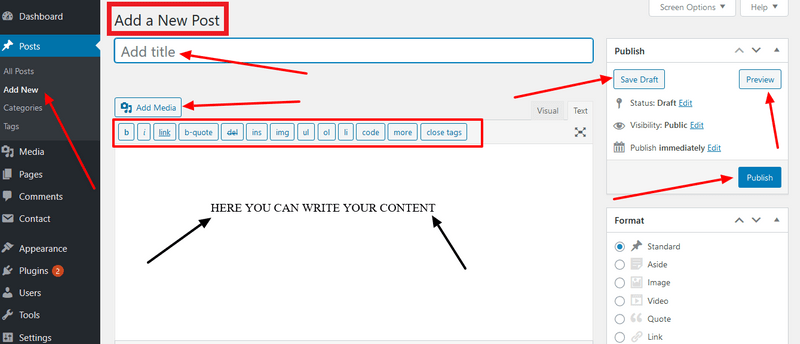
This is where you create your blog posts.
You can see that there are multiple options like Adding title, and writing your content in the box.
You can also format your content through different options. Like for adding media files you can click on “Add Media” and upload any image or video for your blog post.
On the right side, you have the options to save your post as a “Draft” and “Preview” it to see how it looks to your readers.
Here can also put a “Featured Image” for your blog post.
Once you are fully satisfied with your post you can simply click on the “Publish” blue button present on the right side.
Make sure to optimize your meta title and description
Before you publish your post make sure that you have properly written your Meta Title and Meta Description.
For easily editing your title and description you can install either Yoast SEO or Rank Math Plugin. But I recommend you to install Rank Math.
After installing it you can scroll down to the bottom of your post where you can fill your own targeted keywords and increase your search engine visibility and click through rate.
Once everything is done you can hit publish and make your first blog post live.
Create Important Pages for Your Blog
Pages which are important to create before your blog’s launch are Home Page, About Page and Contact Page.
Creating pages is as easy as creating a post which we have learnt above except that you cannot categorize or tag your pages like a blog post.
Pages are static in nature which are not required to be updated time and again as in case of post.
Before you launch your blog , you must have these pages for your readers to understand what’s your blog all about.
Let’s go one by one and create the important pages for your blog.
Homepage
Homepage is the primary URL page which means it is on your primary domain. It’s an important part of your website being the most visited page.
In your home page you should do the following things: h5
-Your visitors should love your home page.
–Describe about your Blog in a lucid and brief way.
-Also use icons and images while describing your blog.
-Add Testimonials.
-You can put a large image on the top of your homepage with an email opt in to get email subscribers.
–Build Audience Trust with quality and valuable information.
-Have important blog post links enabling easy navigation for your readers.
-You are not required to hire a professional designer, rather you can create a well-designed home page with the help of Elementor Page Builder.
About Page
You may get stumped when asked to describe yourself but that’s the most important question. Your identity, who you are?
When a visitor comes to your blog, they are curious to know about you and the direct answer should be on your About Page because this is where they’re going to land.
A good About Page builds trust among your readers and it is an opportunity to inspire your readers.
Remember the following things before creating About Page:
– Clearly describe your role and in case of a team your team’s role in your blog.
– Write your brief story and why you started this blog. It will connect your readers.
– Tell about your expertise and how you can help your readers.
– Your Page should have photos. It can be your personal pic.
– If you are a group you can put pictures of your team.
– You can also photo video introducing yourself or your business
-If you are too shy for publishing a photo, take the help of caricatures and illustrations.
-Link your most read blog posts on your About Page.
-Remember, it’s your profile so make it simple and be yourself.
Apart from it you can research some About Pages related to your niche and get some ideas and inspiration.
Contact Page
Through this page your readers will be able to reach you.
Make a simple Contact Page and include your contact details like your business email address, phone number, social media links.
Apart from it you can also create a contact form where your readers reach you and ask questions.
An easy-to-use contact form gives your contact page a professional look.
Your contact form should include fields like name, email address, phone number, company name, a field for file attachment, a query box.
Your readers will fill this form to contact you.
The benefit of having a contact form is that you will have some basic details of the person whom you are going to reply to.
Privacy Policy Page
Privacy Laws means if you collect personal information of your readers like their name, email, phone number, address etc. you are required by law to have a Privacy Policy Page in your blog.
General Data Protection Regulation (GDPR) and The California Online Privacy Protection Act (CalOPPA) are examples of Privacy Policy Laws.
This is a very important page which you must have on your blog.
Apart from Privacy Policy, also create a ‘Terms of Use’ page.
Set Up your Blog’s Menu
As you have published your important pages you can now set Header and Footer Menu making your readers easily access these pages and also posts.
In the dashboard hover on “Appearance” and click on “Menus”.
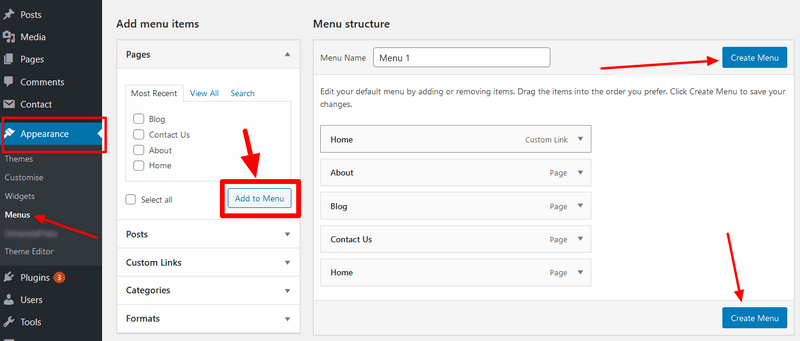
Here you have the options to create a Menu and add pages and posts to your Menu. It is very easy and can be created in a few moments.
Free Stock Photos for your Blog
As a blogger you also need images in your blog posts in addition to texts for an enhanced reading experience.
But the question is where to get free images from?
Well there are a number of websites which allows you to download high quality images which are absolutely free. You can use these photos in your blog without any issue.
The best websites for blog photo resources are:
Pixabay
Unsplash
Stock.xchng
11. Regularly Publish Content on your Blog
Now that you have successfully created your blog with your posts and pages you must not think that you have completed your task.
Consistency is your key to success in blogging
You should frequently write blog posts and publish it regularly in your blog.
There is no hard and fast rule as to how often you should publish a new blog post. Some bloggers publish about 2 times a week and some 4 times while some go beyond that.
Blogging frequency is a quite complex issue to decide. According to a research study, companies that publish 16 plus blog posts each month get 3.5 times more inbound traffic than those companies which published 0-4 blog posts each month.
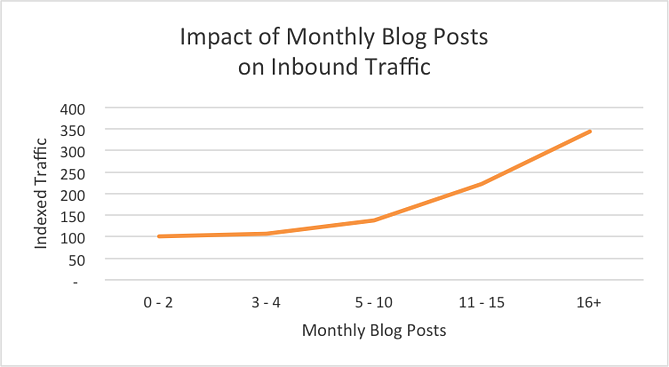
Source: Hubspot
Start with One Per Week
You can start with publishing at least one blog post in a week consistently and once your blog grows and you have resources to expand, you can hire freelancers to write for you more content every week.
Give them an outline of your content and they will do the rest. After they finish preparing, you can go through the editing process once and publish your blog post. rest is handled by them
But at the initial stage while you are writing blog posts yourself it requires consistency.
Maintain a Schedule
You can make a plan on how many posts you will be writing each week and do Keyword Research to get information on different metrics like Blog Post Title, Search Volume, Targeted Keywords, Number of Words.
Once you get the information make a spreadsheet with each heading under different columns and work accordingly. This way you will not get distracted.
Regularly Update your Older Blog Posts
Apart from this, you should also regularly update your older blog posts to maintain the freshness of your content.
Google loves freshness and it is in the best practice that your posts should be updated with new information which are helpful for your readers.
Even readers would like to see new things in your blog whether it is an updated blog post or a new content which you have published.
A study by Markletic.com suggests that a post starts a new lifecycle and shows an upward trend again when it is updated with relevant content.
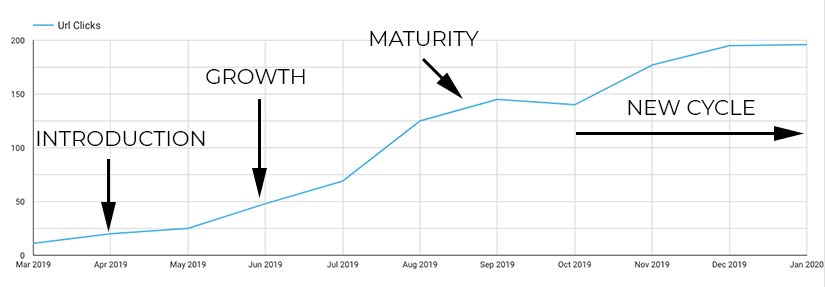
Source: Markletic
Reasons to Update your Content
1. Visitors are less likely to click on older outdated contents as compared to updated contents. So, update your posts regularly to increase user engagement.
2. If your CTR (click through rate) is low for some blog posts it indicates that you need to work on it and update it.
3. If a particular post is getting little or no traffic you need to update it. Check out the problem and solve it. Try to add some new information.
4. If links in your article are broken you must change it with a working link to avoid a bad experience to users when they land up in a page with a 404 error.
5. Updated Content improves SEO making your content ranks better in search engines with minimal effort.
12. Grow your Blog
Plan a content strategy
Just having a blog is not enough to build business rather you have to build a strategy in achieving success.
Planning a proper content strategy is a vital step towards building your blog’s authority.
Let us break down things to consider for an effective content strategy:
Target the Right Audience
The first thing that you should know is who will be reading your content.
Ascertain your target audience and depending on different types of audience you have targeted you can decide on your content strategy.
You can target your audience based on their demographics, sex, age, behavior or any other relevant metrics.
Successful content marketing is all about solving your reader’s problem. This way your content will be more relevant and engaging.
HubSpot has come with a representation of buyer’s journey by breaking the journey into three stages: Awareness, Consideration and Decision.
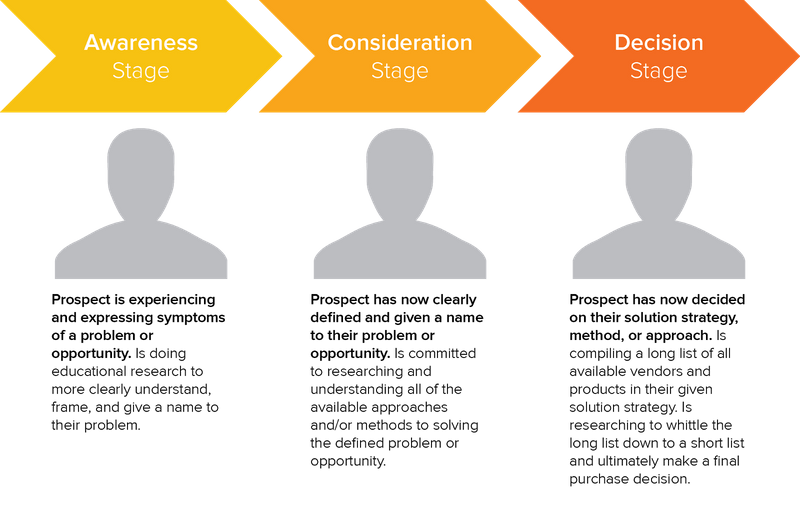
Source: HubSpot
You have to take your content not as a product but as a solution to your readers problems and focus on building valuable content towards achieving that goal.
If you can successfully do that it will build a strong trust between you and the reader and this will portray your blog as an authority on the subject.
Your readers will be more than happy to take your consultation or buy a product.
On the other hand, a failed content marketing strategy is about directly pitching your product for sale without understanding the audience.
Brainstorm Content Ideas
Now that you’ve understood how a successful content marketing strategy works out by solving the audience problem.
To move forward you need to find out specific keywords to get an idea of what your target audience are asking online.
For finding those specific keywords you have to do ‘keyword research’.
Use Long Tail Keywords
You must include long tail keywords of your main keyword in your blog post. For example, in this post my primary target is ‘start a blog’ so long tail variations can be ‘How to start a blog in 2022’, or ‘How to start a blog for beginners’.
In case of commercial intent keywords or high intent keywords its long term variations have low competition and high conversion rates. See this infographic to understand the concept:
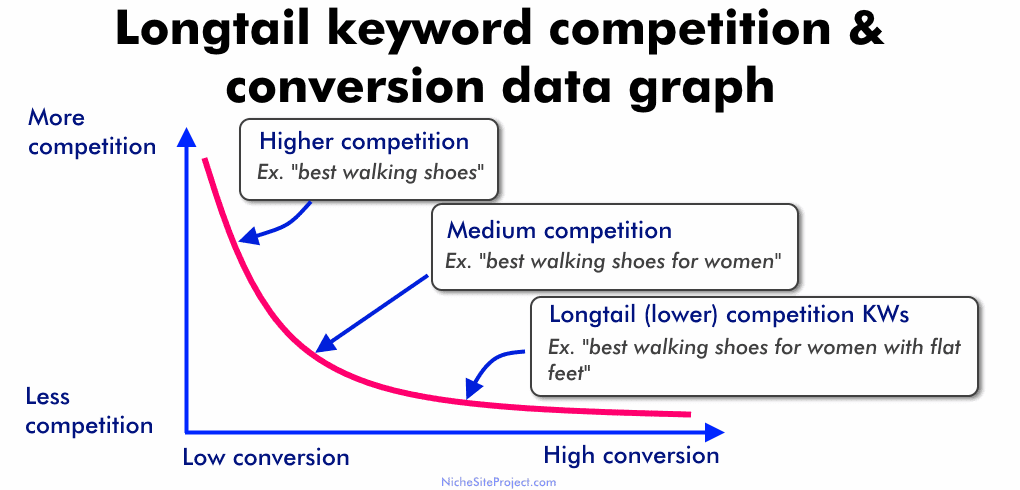
Source: Niche Site Project
The reason for high conversion is that user has a high buying intent and wants a specific information like shown in the example ‘best shoes for women with flat feet’. Once a user gets what she want she will buy the product.
Include LSI (Latent Semantic Indexing) Keywords
Also include all those keywords which are semantically related to your primary keyword. These are known as LSI (Latent Semantic Indexing) Keywords.
Semantic keywords are not synonyms instead these are words which are closely attached to your primary keyword. You can easily understand this here:
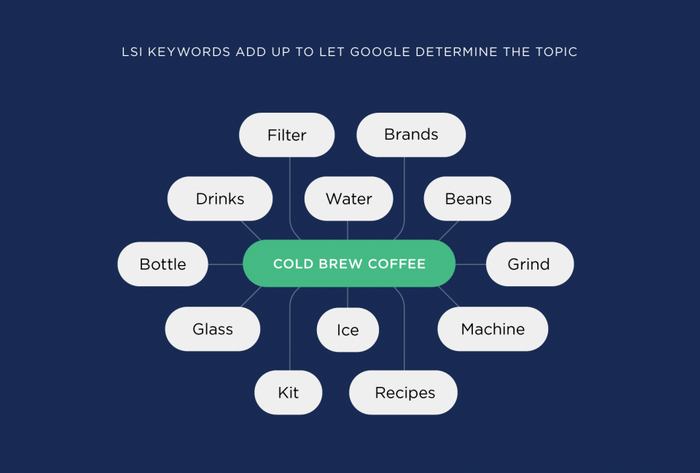
Source: Backlinko
Here the primary keyword is cold brew coffee and the LSI keywords are all the other words in the picture.
Including LSI Keywords in your blog post will increase your rankings in Google and you will rank for multiple keywords.
LSI is not about filling your blog post with multiple keywords but it is about creating a better content. You must have a balance approach in this regard.
You can scroll above where I have already explained in detail how to perform keyword research. I’ve also mentioned about free tools as well as paid tools.
Use Research, Statistics and Case Studies
People love to read articles backed by Research and Statistics as it brings much trust and authority.
Data Driven posts bring in more engagement and provide more value to your audience thereby building your blog’s credibility.
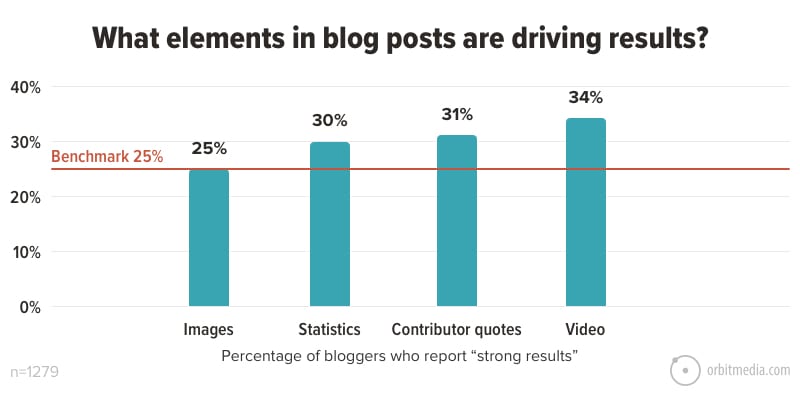
Source: Orbit Media
In a survey conducted by Orbit Media it was found that statistics drives 30% results in blog posts which is a huge percentage.
You can create a data driven blog post by first collecting data through research and thereafter create content with statistics, infographics and charts based on your research. You can also use some external links to assert your point.
On the other hand, you can include Case studies while writing your blog post.
Case studies are niche specific and focus on your audience problems while displaying the process with figures and statistics.
Methodology of doing a Case Study:
-Highlight the Problem
-Figure out probable solutions
-Perform Test and Analysis
-Give your conclusion
You can write an entire article based on a case study. It makes your content stand as an authority.
Start Guest Posting
Guest Posting is one of the best ways to drive traffic to your blog. Guest blogging means that you will write an article for another blog or website.
The exchange is that they will get a quality content free and you will get a backlink to your site.
The primary benefits are that you’re gaining traffic from the website where you have posted your article through clicking on your link and this backlink will not only boost your SEO ranking but also increase your blog’s domain authority overtime.
You may not have much organic traffic in your blog but if you are successful in publishing multiple guest posts in high domain authority websites your blog will be in front of a large and targeted audience.
Guest Posting Opportunities
To know which sites relevant to your niche are accepting guest posts you need to do research. One simple method is to Google your keyword along with the word “write for us”.
For example: if my keyword is blogging, I will type blogging “write for us”.
Google will display a number of sites which accept guest posts. Visit these sites and check what content they lack. Also make sure to read their guest post guidelines properly.
Accordingly, you can prepare some relevant topics and pitch them for a guest post opportunity through an email.
Pitching Your Guest Post
Your guest post pitch email should be able to convey how you can provide value to that website through your content.
Your email should be professional with all the required information and it should be short and precise to the point.
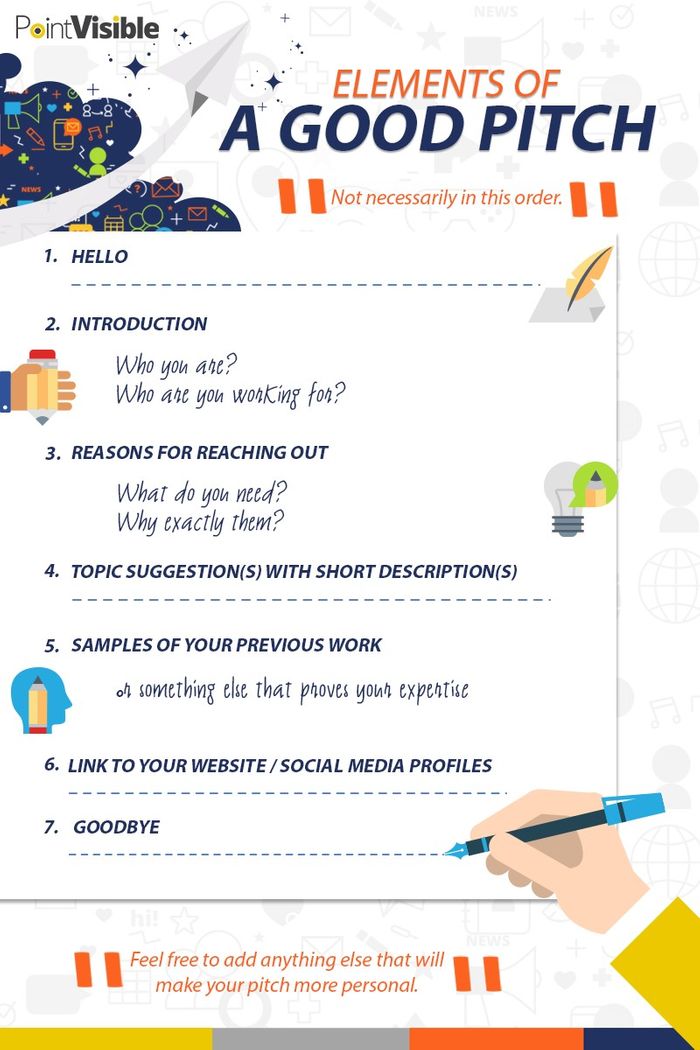
Source: Point Visible
There are some Guest Blogging Networks where you can look up for guest post opportunities like:
BlogDash
BloggerLinkUp
Guestr
GroupHigh
Put your effort in pitching guest posting email outreach to High Domain Authority sites as having an article on a High DA website makes it rank well as compared to a Low DA website.
To check the authority and Spam Score of a site you can use Moz Link Explorer.
Build an Email List
Building an email list is very important for reaching out to your readers. Whenever you publish a new blog post you can inform your subscribers about it with a link so that they can visit your site and read your content.
If you do not have an email list, your loyal readers will not be able to know when you are ready with the new content.
So, building an email list is very important.
Build an email list fast by doing the following things:
– Have a Call to Action (CTA) on your homepage
– CTA buttons on every landing page to subscribe to your blog.
– Offer something in return if they subscribe to your email list. It can be a free checklist, a free e-book or a 7 days free email course.
In this way your visitors are more likely to be your subscribers and you can successfully build an email list fast.
Importance of building an email list:
- Make your visitors return
- You are able to sell products to your loyal subscribers and make money
- Email is a more personalized form.
- You can build your own community.
- Even if you’re unable to rank in search engines, your email list will be a valuable resource for you to gain traffic.
Your email list is your community and once it starts growing you will have a huge number of people in your community. This way you will build a loyal audience through which you can grow your blog as well as your business.
Get Social
You can reach your targeted audience in different social networking sites like Facebook, Instagram, Pinterest, Twitter etc.
Use these channels to reach your audience by creating accounts, pages and groups in the major social media networks.
At the initial stage when you are not getting enough traffic in your blog, referral traffic from social media sites can help a lot. Your targeted audience will be able to know about your content when you post and share it through social media.
Build Relationship
For growing your blog, you have to build relations with other guys in your niche. These platforms can be helpful for promoting your blog.
Make your content powerful and best loaded with research and statistics and ask other bloggers to share it or link to it giving them the reason that it will provide value to their audience.
You can find influential bloggers in your niche by a simple google search or through platforms like BuzzSumo and Ninja Outreach.
Some of the proven ways to connect with other bloggers are:
– Visit their blogs and participate in the discussion by commenting.
– Offer them a Guest Post.
– Include content and links on your blog posts which promotes the blogger and the blog
– Take their interviews and they will share them with their audience.
13. Monetize your Blog
After all these hard work if you are not making money through your blog you will soon lack interest and may stop working on your blog.
You have to use some methods to monetize your blog but also have some patience for a few months till you see results.
As a beginner you can use these monetization methods for your blog:
Paid Services
Offering your paid services through your blog is a good idea. Your readers and subscribers may want to consult or hire you for helping them.
It all depends on your niche what type of services you can offer. In case of blogging as a niche services can be offered in things like:
Writing Services
Infographic and Images
Keyword Research
SEO Services
Ad Campaign
Blog Design
And many more.
You can create a page titled “Services” or “Consultation” and describe the services you offer and the charges for each one of them.
Do not think that people will not come to a newbie.
For example, if B2B’s come to your website and they really like your style of writing they would be willing to take your Writing Services or if someone likes your Infographic, they may ask you to create one.
If your content is helpful and valuable businesses or individuals will contact you for consultations and you can charge a good amount.
You can also pitch them and offer your service.
Affiliate Marketing
The next monetization process for beginners is Affiliate Marketing which is the largest monetization source for many influential as well other bloggers.
For starting Affiliate Marketing you can join the companies in your niche which have Affiliate Programs and they will give you a special affiliate link through which they can track sales done through you.
You have to put those links in your posts and pages where you are promoting or citing those products. If your reader buys through your link you get a commission from the company.
As a beginner it may be difficult for you to search for companies related to your niche which offer Affiliate Programs.
You can join Affiliate Networks like Share A Sale or Commission Junction where you’ll easily find different products in your niche.
After sometimes of your blogging journey you can try these methods:
Selling e-books and Courses
You have gone through the process of creating a blog and have slogged most part of your time in promoting content and doing SEO for your blog and after many failures you could stand where you are now.
In this process you have gained a lot of experience. You can guide others in the field and share your experience so that they will commit those mistakes and utilize that time in a positive way for their blog.
You can create this guide in the form of an e-book or a course with videos along with written materials and sell them to your readers.
Selling Physical Products
Selling Products directly to your audience is also a good way to make money. Selling physical products depends on a niche. If you find it suitable, you can create a separate which may be titled as “Our Store” to display your physical products.
You can take the help of ecommerce plugins like Big Commerce and create a store section in your blog.
There are examples of a blog being successfully transformed as a business. For example, Eric Bandholz turned his blog Beardband into a business of selling the beard grooming products and earning over $100k per month.

Source: Beardbrand
Sponsored Posts and Reviews
Once you build your community and have good traffic, companies in your niche may approach you or you can pitch them for a sponsored post of their products.
In sponsored ads the company will pay you for publishing posts in your blog about their product.
Similarly, you can charge a company for writing a review about their product.
Please check the disclosure and other laws of your area before writing sponsored posts and paid reviews.
In the U.S.A. bloggers have to comply with FTC’s Endorsement Guides before publishing sponsored posts which includes disclosing that the post is a sponsored post.
How to Start a Blog – FAQ’s (Frequently Asked Questions)
Is blogging profitable in 2022?
Yes, no doubt, blogging is profitable in 2022 as it was earlier. Many people have become successful through blogging in 2022, some of them have just started this year and are easily generating revenue from their blog.
There is no doubt that blogging is still profitable in 2022. You can earn money through blogging by various means like offering your services, affiliate marketing or selling products.
Affiliate Marketing is a big and thriving market and there are so many bloggers whose majority earning is from Affiliate Products.
Does blogging have scope in 2022?
Your landing on my blog post proves that blogging has scope in 2022 and I hope it’s going to remain for a long time. We can’t imagine the internet world without articles or blog posts. It’s quite unusual.
People are still reading blogs for information, education or for solving their problems. Videos play their own role but for a deeper understanding of an issue or to learn something in detail, a blog post or an article is very helpful.
What is a blog and how can I start a successful blog?
A blog is an online website which conveys information and education to readers through blog posts which are regularly updated. It may also allow discussion in its platform. Blogs can be of multiple niches /topics or it can be on a single topic.
Some of the key points that you should keep in mind for starting a successful blog is
-choosing a niche based on market demand and affiliate marketing opportunity,
-quality content,
-optimized and properly designed website using professional page builder and theme,
-email list building and marketing,
-SEO and Guest Post for building backlinks and growing traffic.
You can start a successful blog by reading this guide properly from the beginning. I have mentioned in detail how you can successfully start a blog in 2022.
Do bloggers make money?
Yes of course! Bloggers are generating extraordinary income. Although many bloggers fail but still if you do it well you can scale your blog and make a good amount of money.
Many have left their job and become a full-time blogger once their blog grows. There are many success stories of bloggers who have published their blog income reports showing six figures income.
Bloggers make money through various means like affiliate marketing consultation and other services, paid courses, sponsored posts, selling products etc.
The income potential is high in blogging but you have to take the right decisions as many bloggers have although started the blog in haste and after a short span of time, they realized that they have taken a wrong decision in choosing their niche or registering their domain name.
And in these cases, they had to go back and start again from scratch.
Therefore, I strongly recommend you to learn basics and make the right decisions in the beginning so that you will not fall in between.
Read the present post thoroughly from the beginning and understand the choices that you may make when you start a blog.
How Do Bloggers Get Paid
Bloggers get paid through different sources. The most common is advertisement through advertising networks Google Ads.
But there are other primary methods through which bloggers get paid like Affiliate Marketing, Selling Services & Courses, Paid Membership.
Take examples of a cooking recipe blog or a wealth & fitness blog.
Cooking recipe bloggers can promote cooking wares and kitchen appliances of different companies as an Affiliates, whereas fitness bloggers can promote health products and supplements.
If the reader finds their product and the deal worthy, they will definitely buy it and in that event the blogger gets paid.
Bloggers also provide Writing, SEO and other services to their clients and they also sell courses on the subjects and topics in which they are an authority or are expert.
There are also high traffic blogs who make a subscription model for their readers. They have monthly or yearly subscription plans and since their readers find the content valuable, they don’t mind paying a subscription fee for getting regular and updated information on a particular topic from these blogs.
How do you become a blogger step by step?
You can become a blogger by simply starting a blog. For a detailed answer read this post from the beginning.
In short these are the steps to start a blog:
- Choose a Niche and a domain,
- Buy a hosting,
- Install WordPress as your CMS,
- Choose a Theme
- Install all important plugins (detail list in No.7 of this post)
- Create Pages and Posts
- Setup a Menu
- Do some basic customization and settings.
- Regularly publish new content and update older posts
- Make a Privacy Policy, Terms of Use and Disclaimer Page.
- Grow your blog through adopting an excellent content strategy, guest posts, email list, social media, and building relationships.
If you are a beginner you can go into details about each step by reading this post from the beginning.
How do you start a Blog for Free in 2022?
You can start a blog absolutely for free in 2022.
If you’re just starting out and want to experience what blogging is all about, you can go with the platforms like Bloggers, Medium, Tumblr and even WordPress.com. You can also try Google sites which is also a free platform.
But in free methods you will not have your own domain and everything at the backend is controlled by the platform provider. If they want, they can put your site down.
Blogging using a free method is ok if you are just trying your hand out but for serious people who want to start blogging as a business and make a successful career must go with a paid method i.e. buy your own hosting and domain.
I recommend buying a hosting plan with Bluehost as they give domain name free for 1(one) year when you purchase their hosting plan.
How Much Does it Cost to Start a Blog?
The cost for starting a blog includes buying a hosting and a domain, theme, page builder, cache plugin among others.
The basic cost break-down for starting a blog:
Domain Registration: Registering a Domain Name will cost you between $10 and $15 annually. But if you are going with Bluehost hosting plan for 3 years, you will get a domain free for the first year.
Hosting: Buying a Shared Hosting will cost you around $2.95 per month with Bluehost basic plan and for a cloud hosting it will cost $10 per month with Cloudways.
Generally, a shared hosting is sufficient for a beginner to start a blog.
But if you start a blog expecting much traffic from the beginning like in case of news blog you can go with a cloud hosting.
Total Cost
If you want to start with basic features and upgrade later it will cost about $46 to $56 per year.
If you want additional features like cloud hosting, page builder, a premium theme or a good cache plugin like WP Rocket to scale your blog, it will cost you about $300-$400 per year.
Do I have to pay taxes from my blog’s income?
Yes, like any other business you have to pay taxes from your blog’s income. The amount varies and may depend on the income of the individual blogger.
You can register your business as a Sole Proprietorship, a Partnership or a Limited Liability Company and file appropriate tax returns accordingly. Please check out the local tax laws of your area and comply with their requirements to avoid any issue.
It is recommended to take advice from a qualified tax consultant or a qualified tax practitioner.
How to rank my blog fast in google to get readers?
You can do the following:
Make your content SEO Optimized by including targeted keywords in your title, body and meta, include engaging images, infographics and videos, include case studies, statistics and reports with proper citations.
Build Authority Links for your blog by guest posts, interview opportunities and content share.
Get Social in platforms like Facebook, Instagram, Twitter, Pinterest, LinkedIn.
Final Summary on How to Start a Blog
We have come to the conclusion of this ultimate guide on how to start a blog in 2022. Starting a blog is not a daunting task as you may have realized after going through this tutorial.
Follow the steps provided in this guide to learn about choosing a proper niche, registering a domain name, buying a hosting, designing your blog with a good and light weight theme, installing plugins and publishing your pages and posts.
Regularly put new contents, update older ones, promote your blog and monetize your traffic.
If you start smart and remain consistent with what you are doing, you’re likely to get success fast.
But unless you act, it’s just a wish in your mind.
The world belongs to the doers.
Start your blog with Bluehost @ $2.95 per month with a free domain for 1(one) year.
Drop a comment how do you find this guide or let me know in case I missed something in this guide.